Pages

Saturday, December 15, 2012

Merry Christmas to YOU Blog Hop

1st I would like to say my prayers are with the Families in Conn.


 Hi you all I hope your enjoying the hop this is the card I have done for you all today
 This card started with the squirrel cut off of Jolly Holidays cricut cartridge. I used Liquid Applique to give a real nice 3D effect to my card. It's really cool to use on Christmas cards to give an effect resembling snow or the fluff on a hat.
   
 First you want to cut out the parts and glue the layers together. The layer cartridges are pretty cool to use because they add cut marks for lining each piece. I use Scotch scrapbooker's liquid glue in case I have to wiggle any of the pieces to fit (dries quick though)(cut out at 3")
 Next you want to put on the liquid applique (mine is from Marvy, you should be able to get it at any scrapbook store). I have added the liquid to the white on the hat and used the heat gun to make the applique effect.
 Add some stickles to dress it up and it looks great on the front of a card. Takes about an hour to get it put together from all the pieces cut out. Easy-peasy.

Supplies Cardstock: Red, white, black, brown and tan (All from ANW/Crestwood, Inc.)
Patterned Paper:  DCWV the Cristmas Combo stack
Stamps: Merry Christmas from Scrappy Cat
Ink: True Red (Ink it Up)
Pens: White gelly roll pen for stitching
Die cuts: Squirrel from Jolly Holidays
Ribbon: Sheer Red (Jo-Anns)
Trimmer: Cricut and Fiskars
Punches: Fiskars lace corner for the sentiment
Adhesive: Scotch Scrapbooker's Glue
Stickles: Xmas Red, Diamond, Paprika
Embossing powder: SU Iridescent Ice with the fluff
Electronic cutter: Cricut Expression
Tools: as we call the basic kit (it all sits out on my craft desk)

Thanks for stopping by my corner of the world and you next stop is at  Tahi Scrap Corner
(Small world, we both have a craft corner in this big world) 


Monday, December 10, 2012

Snowflakes, Snowflakes and more Snowflakes

Hi All and if you came from Card A Day Blog welcome,

I would like to share today a card I made for the holiday. I enjoyed doing this card, I worked through a new technique on this, Double Embossing for the background piece, it is a fun technique to learn and it didn't turn out to bad.


On the card the snowflakes were cut from the Holiday Cakes cartridge. It and the snowflake border was cut from the DCWV Christmas Combo pack. The embossed blue card stock was done with double embossing. Dry embossed with cuttlebug snowflake folder and heat embossed with clear embossing powder. The stamp was one I received from a friend of mine. added some blue ribbon, a blue snowflake from a Jolees bling pack and some blue stickles. 
Thanks for stopping by my little corner of the world........

Saturday, December 1, 2012

Jingle Bell Rock Hop

Hi all and welcome to my blog. My project for this particuliar hop was found in the Tis the Season cricut cartridge
 The card base is red cardstock from one of the value packs, the background was cut out of music paper I got from a paper purchase on 2 peas in a bucket for sale board. Now the cut is from Tis the Season CM cartridge

and what is cool about it's all right there to be cut out and makes a great focal point on a card. It was cut out at 3.75" which as you can see it filled up just about the entire A2 card.
All the pieces for the cut came from scraps I had on hand. A ribbon border with a bow to add some texture and now I got a cute card ready to go. Don't forget to leave a comment and check out the next stop on this Jingle Bell Rock Hop.
Thanks for stopping by my little corner of the world......
Your next stop is Amanda at  Crick`tn Crafts and see what she is rocking!

Tuesday, November 27, 2012

Thank You Holiday Style


Welcome to another theme from Card A Day Blog. Today I'm the designer over at the blog and the theme this week is Holiday Thank You. The card I made for today was easy to do and during this time of year easy is good! The card will be given to my brother and his wife for they are hosting Christmas Eve this year in their new house.
I searched today during lunch on google images trying to find some inspiration for this theme and I came across this card from Simple Stories and thought this would be a quick and easy card to make for a Thank You card.
Merry merry christmas Donna Jannuzzi 1
Isn't this just a really fun card with so many different elements. So on my card I took the thought of a border print (to save time) for the 3 pieces that make up the border background on this card. I used 3 snowflakes in the upper left-hand corner similar to what they have here with the buttons and the snowflake. Then I took the sentiment location and made it similar on my card.

Mine has similarities but not quite the same which adds just a different twist on a card lift. I want to thank simple stories blog for providing such inspiration for me to use.
Pieces I used to make the card:
The card base came out of a prepackaged card/envelope kit (easy way to have cards on hand). Decorated with the elements you see here, paper came from DCWV 180 Christmas Stack pack, Glitter tape border form American crafts, the 2 snowflake brads is from recollections and the middle snowflake came from K&Company die-cut sticker pack, the tag came from my stash and the sentiment came from a dazzles pack of writing I had on hand. One of thee quickest cards I think I ever put together too less than an hour to do and looks fantastic.
Thanks for stopping by my little corner of the world.....

Monday, November 19, 2012

Creative Cutting Christmas Card Challenge

Hi you all,
Thanksgiving may be around the corner, but as a crafter I'm in Christmas mode! I've been busily making my Christmas cards and tags this week and this is one of the ones I have made


I made my card today from the Christmas Tree set from Creative Pointe. This set has 4 fun trees in it, but I chose two of them for my card, a skinny one and a fluffier one. I did a 5” X 7” card base from a sample pack of cards I got awhile back. I chose a holly style background pattern and the trees were cut from scraps. The sentiment cutout is a free cutting file from svgcuts.com/blog. The sentiment and ribbon border is from Stampin Up. Stickles and a few dollar store gems decorated the trees. The card was fun and easy to put together.

 Won't you join us over at  CREATIVE CUTTING CHALLENGE the new Challenge is Christmas Cards, elements cut from svg files.

Thanks for stopping by my little corner of the world......

Monday, November 12, 2012

Wow have you heard about this:

I stumbled upon this in one if my facebook groups and wanted to share it with all my followers:

This is the information on her blog about it:
"GUYS!!!  I'm so excited to finally be able to share the news with you about a blog event I'm having here for 5 straight weeks.  I was able to get in touch with a few companies and online shops to help sponsor this event and donate some prizes FOR YOU ALL!!  How cool is that??

For those of you who joined me last year when I did "30 Days of Christmas", you might remember how it works, but this year it'll be a bit different, being that there are tons of prizes to giveaway.
Starting Monday November 12, and continuing every week day all through December 14, I will be sharing Christmas projects with you via my blog and youtube channel.  Your involvement is simple and required if you care to win any of the prizes listed below.  Just read the RULES HERE and play along each day/week."

Wow there are lots of prizes and lots of inspiration too! I'll be commenting each day for a chance to win. Thought you might want to join in on the fun too. the badge in the right side pane will take you to the rules. Enjoy! 
Thanks for stopping by and visiting my little corner of the world......

Sunday, November 11, 2012

Christmas Ornament Card

Hi y'all, and welcome to my blog. Happy Veterans Day!
It's a new week at Card A Day Blog.  Our theme this week is 'Christmas Ornaments.'  I borrowed the idea for my card from a card I received in a swap last year.  The card was so cute I had to make one too.

The ornament was cut @ 3" fro the Christmas Cheer Cartridge. The blue paper border was cut with fiskars scallop punch. The stripe paper is Christmas paper from Fancy Pants and the ribbon is from Stampin Up-celery. Used rhinestones in a pack I got from the local Dollar General. Everything was put on red cardstock.

This card is so versatile for a quick and easy Christmas card that the cricut has many different choices for an ornament. I hope you like it as much as I do, a little sentiment and off it goes!
Thanks for stopping by my little corner of the world today......

Monday, November 5, 2012

Creative Cutting Challenge-Christmas Gift Tag

Hi all,
the challenge this week at Creative Cutting Challenge is Christmas-Anything but a Card. I designed a gift tag for this challenge.

 
I made a Christmas tag for this challenge. The base of the tag was first cut from the back cover of a paper pack to get it some weight. Then it was cut again in the covering paper that was from the DCWV Christmas Combo 180 Stack. The tag came from a set that was free from Cre8ive Cutz. I used Creative Pointe’s Christmas Set for the Santa and the Christmas writing. Both of these cuts were cut out with scraps using my Scal program. I cut the Merry from one of the fonts with Scal and added red stickles to it to give it some Christmas bling. The ribbon is from Joanns 1.00 bin. 
 
I really like how it turned out and is really going to look fantastic on that special gift.
Check out Creative Cutting Challenge and consider joining in.
Have a fantastic day, and thanks for stopping by and seeing my view in my corner of the world 

Saturday, November 3, 2012

Nothing Says Home At Christmas...

Nothing says home at Christmas more so than your Christmas stocking. Growing up at home our stocking got hung up on the book case.
It was the first thing we attacked in the morning, Mom could get so many things into that stocking including a tangerine in the toe. Now at our home we hang our stockings on our bookcase and my hubby is just as good as my Mom was at filling up a stocking and it's the first thing we attack! LOL!
Hi you all and today I'm the designer over at Card A Day Blog and I'm finishing off the theme this week of Home for Christmas. This card was made from all Close to my Heart products. The stockings, sentiment, and the snowflakes that stamped all over the background cardbase are from the Oct. 2011 Stamp of the Month Holiday Magic. The cardbase is Olive cardstock and then stamped with Topiary ink and green stickles, also the red stocking has red stickles scattered all over it. Popped up the red stocking to give it dimension and matted with red and colonial white cardstock. this is a fun and easy card to make. Keep checking back with Card a Day Blog for more Christmas inspiration.

I will be pulling all the past months winners this Tuesday, it's been a fairly busy month. Hope you all have a great day and thanks for stopping by to see the view from my corner of the world.

Saturday, October 27, 2012

Creepy Crawlers and More Blog Hop & a Card

Welcome to our Creepy Crawlers and More Blog Hop!!! This is such a fun time of year! Our creative juices start flowing and it all begins at Halloween. This is probably the one time we can get really silly and SPOOKY with our projects. It’s like we become little kids again. So we gathered up some very talented Witches who wanted to show off their projects. NOW DON'T MAKE THEM MAD, BY NOT LEAVING A COMMENT! THEY HAVE BEEN KNOWN TO PUT SPELLS ON BLOGS.
And of course we have CANDY!! You have to give out CANDY on Halloween. All you have to do, to be entered into the drawing is,
  • To hop to every blog and leave a comment
  • Go to Jennifer’s Face Book page, Leave a comment and Like her page 
           http://www.facebook.com/wunderscreations


Here is our line up:
  1. Pamela ~ http://kraftykatstampstudio.blogspot.com
  2. Colleen ~ http://www.cbcscrapbooking.blogspot.com
  3. Katie ~  http://katiesworldofcrafting.blogspot.com/
  4. Jennifer ~ http://wunderscreations.blogspot.com
  5. Jennifer J ~ http://creativecricutdesigns.blogspot.com
  6. Tina ~ http://tinasscrapcorner.blogspot.com/--------> You are here
  7. Cathie~http://cathiescafe-scraphappy.blogspot.com/
  8. CallyAnn-http://callyanncraftycreations.blogspot.com/
  9. Miriam ~ http://miriamscreations.blogspot.com/
  10. Rachelle~http://creationsbyRachelle.blogspot.com/
Hi you all. This is the card I made for the hop. I like it so much, I made for a swap too.The card was cut out from various cricut cartridges. Card base is from CTMH craft cardstock cut from A Child's year on page 48 @ 5.5" the shift cut was cut from Rock Star Paper. From Happy Hauntings-cut phrase @ 3.75" in orange and the shadow in purple. Frame 10 @ 3.5" white background, Dk gray frame, purple hand and green Ghoul. I'm glad I had a chance to bring you this card.
It wouldn't be Halloween without some candy so leave me a trick or treat comment and be a follower of my blog and I will randomly draw a winner for some blog candy. Check back Tuesday to see who won.

Now it's time for you Witches to grab your Ghosts, Wizards, and Bats and jump on your broom to fly to Cathie from Cathie's Scrap Cafe
Thanks so much for spending this Halloween Hop with us! Don't eat too much candy!!! And watch out for those black cats!!!

Monday, October 22, 2012

Not Your Typical Turkey

Hi you all and welcome to my blog. I have designed this card for the Creative Cutting Challenge blog.


Created this card from the Thanksgiving 2 set from Creative Pointe. The heading was cut from cardstock from the DCWV Rustic Stack and K&Company Alleghany Plum stack. The turkey was cut from Recollections chocolate lovers pack and the variety of color cardstock from my scrap stash. the background paper and the acorn border came from DCWV Stack 7 pack and came from one sheet of paper. The card base is from the collection of cardstock I have on hand. The corners are fashioning Viva pearl pen-copper. (I still need to work on my application of pearls) I popped up the turkey to give dimension. The colors of the card reminds me of the leaves in their fall beauty right now.

All cuts were done from my SCAL program. The program is sweet for using up scraps:
You can lay it out on the screen and on the mat in the same spots, great use of scraps.

I hope you have enjoyed looking at all the Thanksgiving projects and cards that the team has done and maybe considering doing you own and joining in on the challenge. Thanks for stopping by and seeing my little corner of the world....

Friday, October 19, 2012

A Scandinavian Christmas Card


Hi and welcome to my blog.
Today I'm the designer over at Card A Day Blog and the theme this week is Christmas around the world.  I chose a Scandinavian theme for my card cause the designs are so beautiful.

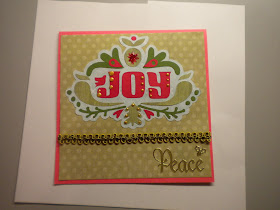
 This card shows that style of design. Scandinavian Folk Art is Bold colors, simple designs, repetitive patterns, flourishes, symmetry, flowers, birds. This card was made from that basis. The main design comes from the cricut cartridge Scandinavian Christmas Cards. This Cartridge shows off the beauty of  Scandinavian Folk Art.
I cut out all my pieces from my scrap box, found this larger scrap for the background and used red cardstock for the my card base. The design was pretty easy to put together about 15-20 minutes. Cut the base attached the sparkly trim (used for a border) to 5.75" and attached to the cardbase. Got out my dazzles and found the Peace sentiment and the holly leaves and applied that to the background piece. Added Viva pearls-Gold and red stickles for the star shape. Well my Christmas cardmaking for this year has officially started. Check back often to see the other cards I will be creating.
If you noticed on the card the way the pearls turned out, this was the first time I used this product I like the really sky point on it, gives great control, but I wasn't ready for how fast it comes out. But after doing the J the rest of the pearls turned out pretty good.

Thanks for stopping by and seeing the view for my corner of the room.......
Stop back in on Monday for another card from the Creative Cutting Challenge and watch this weekend for a couple other surprises.

Monday, October 8, 2012

Trick or Treat Card for a Challenge

Hi all,
I hope you had a wonderful weekend and got lots of cards done. Mine was most excellent!
 Halloween Card Challenge over at Creative Cutting Challenge.
This is the card I created this week:

I created a 6 X 6 card for the theme this time.When I think of Halloween the first thing that comes to mind is to Trick or Treat. So this card portrays that a little bit. The bats are tricking the ghosts or the ghosts are tricking the bats but the treat is the card that was made with some great files from Creative Pointe. The black sparkle cardstock worked fantastic for this card and the files cut so well. I used regular black cardstock I have on hand and the purple paper came for the DCWV Stack 7 pack. The ghosts was cut form Walmart's pearlessence paper and the orange is from my stash. Don't forget to stop over at Creative Cutting Challenge blog and enter a Halloween card you made from an svg file Have a Happy Halloween!

Saturday, October 6, 2012

Half a Century! Happy Birthday!

Yes! Today I turn a half a century old-50! Wow I really can't believe it! Because it's my birthday I want to share in some of the fun with all of you. So this will be an all year party, for 50 weeks (2 weeks off at Christmas time) I will give out a piece of blog candy. 50 different prizes WooHoo! Todays prize is a secret and to win the prize you have to be a follower and leave a comment on this post I will leave it up for the weekend and choose a winner Tuesday morning. Check back often cause I really don't know what days I will be offering the weekly prize.

I also want to mention It's World Card Making day! WooHoo double celebration! My day is planned with some shopping and a few card challenges on a FB group I belong to. To honor the day:
This card was made from the Just Because Cards cricut cartridge. I used various scraps I have left over from other projects. This is the perfect card for a youngster in your life.

So two big events today and 1 winner will win not one but TWO mysterious giveaways! I hope you all have a fantastic day today and make a card to celebrate the day. Stop back on Monday for another Creative Cutting Challenge card. Tomorrow I will be enjoying a daylong crop my first one ever! I'm so excited! Thanks for stopping by and see things from my little corner of the world.....


Tuesday, October 2, 2012

Dashing Through the Snow

Hi! I'm the designer over at Card a Day Blog today and the theme this week is Christmas. I was at a fair in PA this past weekend and I picked up a few gifts from there for Christmas. So it's never to early to shop and never to early to start those Christmas cards.
 This is a very simple card to make but the impact is huge. The card base is some grey cardstock I keep on hand (JoAnns inexpensive cardstock) Then the white layer wiith a scallop border and punched above the points with a 1/16" hand punch. the a layer of cream and a background layer of lightblue snowflakes from my stash.
Now the snowflakes are pre-made and I think on the card it is a Jolees pack I got last year. Now this is a pack that I gotten in a win last winter and will use it this year. But as you can see the bought embellishments can make a card real simple and quick when you need one fast.
The stamp is from SU and the inside has a Merry Christmas stamp for SU too and some snowflakes scattered around it.
Thanks you all for stopping by today and seeing things from my corner of the world....


Monday, September 24, 2012

Autumn Harvest


Hi all,
I'm back again designing for the Creative Cutting Challenge Blog and I created a 12 X 12 layout for the theme this time.

The layout is pictures from 2008 of a good potato harvest that year. When the leaves start to change colors then we usually start harvesting white potatoes.

The layered title plate was cut with SCAL v2 and a part of the Fall Set collection from Creative Point. All the pieces were cut from scraps of cardstock on hand. (Love using up those scraps)

This is a really cute set and could be used for a variety of layouts or cards.This is a really cute set and could be used for a variety of layouts or cards.

Thanks for stopping by and seeing the view from my corner of the world.

Monday, September 17, 2012

Mickey Mouse for the Kids

Hi all, theme this week over at Card a Day Blog is kiddie card, most of my kiddie cards are for my grand children's birthdays. So this was one of the ones I recently did:
 Mickey Mouse is a favorite among my younger grandchildren. But then Mickey Mouse seems to bring out the kid in any of us (you should have seen my husband the first time he was at Disney).
Recipe:
Black A2 cardstock for the card base. Red cardstock embossed that I had received with a swap card mailing. The background behind Mickey is the postage cut from Elegant edges with white cardstock rectangle. Mickey is cut at 3.5 inches.The border is a black & white check ribbon (I had on hand) with a soda can tab threaded thru to mimic a belt buckle this was a really fun card to make and I expect it will give the recipient a smile on their face. the Mickey and Friends cart is a fantastic cart for any kiddie card you have in mind to make. Thanks for stopping by my corner of the world and I hope you have a fantastic day!

Thursday, September 13, 2012

Canadian Thanksgiving-Gratitude

Good Morning and I'm in awe of all the cards made this week over at Card A Day Blog. Hi I'm the designer of the day. My card was made during a local Close to my Heart class.


 Canadian Thanksgiving from what I read is thanking God for the harvest. The colors of this card are perfect for autumn and the stamp set is perfect for this theme. All pieces of this card is from Close to My Heart product line.


 The paper or the card comes from The Dreamin pack. pieces cut at various sizes to look like patchwork. The stamp set is So Grateful with a variety of inks and the leaf is popped up. the inside brought in another cutout of the pumpkin with the leaf popped up and the sentiment I'm not sure what set that was from. But a perfect sentiment for this holiday.

Thanks for stopping by and I hope you have a fantastic day!

Monday, September 10, 2012

New Challenge Site-Enjoy the Ride

Hi all and welcome to my blog. I want to tell you about a new challenge blog I am designing for: Creative Cutting Challenge.What makes this challenge blog so different is that the challenge is to use SVG cuts. It's sponsored by Creative Pointe it is a twice a month SVG cut file challenge blog  Each submission must have at least one SVG file (from any source) used in the project. Come check it out! and if you have the software to cut SVGs then I hope you'll join in on the challenges.
This is my design for today. My grandson's birthday is at the end of the month and this set of SVGs was perfect for his birthday card:
The SVG cuts came from: Creative Pointe "Off Road Set"


The one thing I love about SCAL is that everything is there in one project. I brought everything into the program and built my card exactly as I had imagine it would look but now I can have a visual to it.
Each piece is then put on it's separate color page to be cut from that particular color. I had this all put together in about 2 hours, I'm a bit rusty on using the program, lol!

I popped up the rider to give the card some dimension as shown in the photo. The recipe for the card: This card is 4.5" X 6.25". The background is attached to gray cardstock (cardbase) it look like dirt to me and it is from the DCWV Stack 7 pack. The tire tread and rider from Creative Pointe's off road set were cut out of black cardstock scraps and the gray came from DCWV Metallic stack. The letters were cut from a scrap piece of red cardstock I used the Impact font from SCAL. The is the first in awhile that I have used SCAL and look forward to using it more. All cuts on the card was done with SCAL v2.
Have a fantastic day and if you have access to cut SVG's I hope you will play along and join the challenge. Happy Craftin'


Saturday, September 8, 2012

My Crazy Dogs!

Welcome to our Crazy Dog and Cupcake Blog Hop!  What started out as a random idea for a blog hop turned into a funny theme!  We threw out some ideas on different "odd observances" in the up coming months ~ one being National Dog Day and the other Cupcake Day ~ everyone seemed to like these two themes so we put it to a vote!  Who would have thought it would have turned into a tie?!  So we voted once more ~ thanks to Pamela's creative thinking, she put the two together.  What could be more fun than working with dogs and cupcakes!  So sit back and enjoy the fun and creative projects the group has put together for you today!
No blog hop would be complete without some fun blog candy to win!  Today we have a very gracious
sponsor ~ KaDoodle Bug Designs is giving one lucky winner $15 in free files!  All you have to do to win the prize is:

Your line up today is:
Colleen ~ http://www.cbcscrapbooking.blogspot.com
Jennifer ~ http://creativecricutdesigns.blogspot.com
Maria ~ http://JoyfulStamper.blogspot.com
Nancy ~ http://alwaysastorycreationsbynancy.blogspot.com/
Tina ~ http://tinasscrapcorner.blogspot.com/       You are Here
Jennifer F. ~ http://wunderscreations.blogspot.com
Amanda ~ http://cricktncrafts.blogspot.com
Tahi ~ http://tahisscrapcorner.blogspot.com
CallyAnn-http://callyanncraftycreations.blogspot.com
Miriam ~ http://miriamscreations.blogspot.com
Edwina~ http://edwinascreations.blogspot.com/

 My project for the hop is a 2 page layout
 My Crazy dogs just love the snow! On January 21, 2012 we got 5.25" of snow. Jake the older dark color dog loves to just lay out in the snow, rub in the snow and eat the snow. Now Buddy he is a bit more crazier about the snow. When we shovel snow off the porch, Buddy likes to jump and try to catch the snow in mid-air. So I took this day to get the memory of this on film so while my husband was shovelling I took the pictures and a video. For me to get the complete jump for the page I took clips of pictures of him jumping from the video taken.
It was just a fun filled day in the snow.


Now it's time to grab your cupcake and Fido and head to Jennifer F. blog.

Thank you for hopping along with us today!  We hope you have enjoyed our fun hop.
You'll find plenty of cupcakes in the blog candy I'm offering today-Just leave a comment today and your in the draw. I will post the winner on Wednesday. Thanks for stopping by have a fantastic day!

Tuesday, August 28, 2012

The winners are announced

I am so sorry for the delay on the blog candy for the past 2 hops I've been on.

1st is for the swirl pack from the Dick Clark tribute hop:
I had 11 comments and the Winner is:


Love all the pictures you have! Very neat to have and look back on over the years.
Congrats Jennifer!

For The Watermelon Crawl Blog Hop!
 I had 16 comments and the Winner is:
 

Fantastic layout! LOVE those watermelon cuts =)

Wow Jennifer you are some lucky girl today! Woo Hoo to have your number pulled twice by random.org!
You have 2 weeks to contact me for your prize with your mailing details. 
Thanks for everyone that hopped along and don't miss the next blog hop on September 8 The Crazy Dog and Cupcake Hop......

Monday, August 27, 2012

Just to say

Hi all and welcome
It is Faith week over at Card A Day Blog and today I'm the designer. My card was very easy to make and with the items already on hand really made it easy.
I started actually with the sentiment, which I came across in the book: Just the Right Words. Sometimes when I'm stumped for a card I investigate the books or magazines I have on hand for a bit of help. This one created the whole outlook of the card.
I seen on a facebook group today a tag that was printed and found out from the girl how she did it. She said to do a word document with the writing in the size you want and print it out.
Then pick your choice of what you want the print to go on (I have these (Stampin up) scallop punch Kraft paper ready in a drawer) use removable adhesive and put the piece to be printed over the computer print, wow it worked! I can see this coming in handy for a lot of things.
Then I chose the pieces that I wanted to use for the card. I knew that I had some stamped motorcycles in a drawer already stamped I got in a swap all I did was color it with Bic fine markers. The card base was a ready made one I found in another drawer (really trying to use up stuff I have on hand).
The swirls around the sentiment was cut from, I think, the Storybook cartridge that I cut out months ago for another card, that it didn't work on then. I thought this would add some nice dimension to the sentiment. The ribbon came from a roll and the background paper I got at Big Lots (cheap, wish I would have picked up another pack of the paper that day). So the background paper was embossed with a cuttlebug folder diamond plate.
This card is fantastic for a male taking a big step in life: Graduation or a new job, maybe in a new state.
This card took less that 2 hours to make cause I already had the items on hand, probably the longest part was deciding what to do for the theme. So if you have a few minutes take out some tools and stamp, or punch or even emboss those scraps and you next card will come together in a snap.
Thanks for stopping by and I hope you have a fantastic day!

Saturday, August 18, 2012

Spittin the Seeds-Traditon

Welcome to The Watermelon Crawl Blog Hop! Who doesn’t like to bite into a red, ripe, juicy watermelon on a hot summer day? Yum!!!! If you drive down South, you can find people selling them on the side of the road, out of their pick-up trucks. I think these are the best, because they come right out of the garden.  You will always find a cute watermelon cut out at a baby shower or wedding shower, we eat them on the 4th of July, and we make sherbet and wine. You will find them in our kitchens; on our walls, curtains and cookie jars. And they are so darn fun to craft with.  Today we have some very talented women that want to share their watermelon crafts with you. So come do the Watermelon Crawl with us! You don’t want to miss anything so the beginning of the hop will start at Pamela’s Blog http://kraftykatstampstudio.blogspot.com


We also have some wonderful Blog Hop Candy sponsored by Jennifer Fox. She will be giving away TWO dust covers ~ 1 for a Cricut Expression and 1 for a Silhouette Cameo!
To be eligible, you MUST do the following:
  • go to everyone’s blog and leave a comment
  • go to Jennifer’s business page on Facebook http://www.facebook.com/wunderscreations and like the page
  • leave a comment on her Facebook page indicating which machine cover you want ~ either Cricut or Cameo
  • Winner will be announced Tuesday, August 21 on the business page. 

Here is our line-up in case you get lost,
  1. Pamela ~ http://www.kraftykatstampstudio.blogspot.com
  2. Colleen ~ http://www.cbcscrapbooking.blogspot.com
  3. Jennifer ~ http://wunderscreations.blogspot.com
  4. Jenny ~ http://cccjalessi.blogspot.com
  5. Pam L - http://mzlavr2.blogspot.com
  6. Amber~ http://pixiperfectcreations.blogspot.com
  7. Nancy ~ http://alwaysastorycreationsbynancy.blogspot.com
  8. Amanda ~ http://cricktncrafts.blogspot.com
  9. Shawnee ~http://quiverofangels.blogspot.com
  10. Jennifer J. ~ http://creativecricutdesigns.blogspot.com
  11. Tina ~ http://tinasscrapcorner.blogspot.com
  12. Miriam ~ http://miriamscreations.blogspot.com
If you arrive from Jennifer J, then you are on the right path!

My Project is a layout I did of when the Grandkids were at our house for their last visit before going back home to South Dakota this past July.
 Tradition at our house and probably most other houses is when we get watermelon there will be a seed spittin contest and if your hit you loss (something like tag). I found out about the tradition shortly after my husband and I met and we got the watermelon and he let it rip. So 19 years later it's still going on and our grand-kids from South Dakota weren't any exception to that tradition. So the last night we had them over for a visit at our house it was watermelon time after dinner. Awe Amber I think she was the first to get hit, LOL. All in fun though..... It was a great way to end a wonderful visit.

Now you must crawl over to Miriam to see what is left on the vine.
But remember… to be eligible for the candy you must follow ALL the giveaway rules above.
Thanks for hopping with us and remember…
Have fun y’all, do the watermelon crawl!

 My blog candy-Just leave a comment today and your in the draw. I will post the winner on Monday with the other winner from the previous blog hop.

Monday, August 6, 2012

A Little Foil goes a Long Way

Hi all and welcome to my blog and if you came over from Card A Day Blog welcome too. I'm the designer today and the theme is embossing. Now embossing can be done a variety of ways and with a variety of means.
Aluminum foil can give a fantastic look to an embossed card. This one was embossed with the cuttlebug folders paisley (foil) swiss dots (blue scallop border) and daisy (the lighter blue).

To emboss aluminum foil, for best results, you need to use heavy duty foil and a piece big enough to fold in half twice for 4 layers. Run it through the cuttlebug just as you would any other card stock, trim the edges to make even and clean, that's it. this card was so simple to put together. Just the foil and a few borders, the swiss dots was punched with a fiskars edge punch and the white border is a piece of ribbon. The bling is form a pack of dimensional stickers for Jolee's, blue mini flowers.
Now this one is ready to go just need to add a sentiment, could be used for a birthday card or a winter card. I enjoyed making the card and a tip for you, if you have a day and you don't know what you want to do, get out your embossing machine and run some scraps in folders through the embosser to have pieces on hand and give the foil a try too. If you have the pieces prepared it's just a matter of putting them together to get a fantastic card in very little time.

Have a fantastic day, I know I will, ahhhh vacation.....


Sunday, August 5, 2012

American Bandstand Smash Style

Welcome to our Tribute to Dick Clark, American Band Stand, 50's Style Blog Hop!! Who remembers getting up on Saturday mornings to dance along to the American Bandstand?  The actual American Bandstand show started on August 5, 1957. This is why we decided to bring this hop all the way back to the 50’s. So sit back, shake your booty, do the hula hoop, or have a Coke float and come hop with us. We have some talented women that have joined this hop! If you would like to start at the beginning please go to Pamela's Blog http://kraftykatstampstudio.blogspot.com
And of course we wouldn't forget the CANDY!!! For the Grand Prize, Melissa from Kadoodle Bug Designs is offering a $15 GC to her store!!!!!
 
www.kadoodlebugdesigns.com                
To be eligible, all you have to do is:
Stop by her fan page, https://www.facebook.com/kadoodlebugdesigns, LIKE it, if you haven't already, & post a comment saying you are from the hop. And then visit everyone's blog and leave a comment.
Here is our line- up
  1. Pamela ~ http://kraftykatstampstudio.blogspot.com
  2. Colleen ~ http://www.cbcscrapbooking.blogspot.com
  3. Jennifer ~ http://wunderscreations.blogspot.com
  4. Tina ~ http://tinasscrapcorner.blogspot.com/
  5. Amanda ~ http://cricktncrafts.blogspot.com/
  6. Maria ~ http://JoyfulStamper.blogspot.com
  7. Jennifer J ~ http://creativecricutdesigns.blogspot.com
  8. Tonya ~ http://scrappingfunwithtonya.blogspot.com/
  9. Cathie ~http://cathiescafe-scraphappy.blogspot.com/
  10. Miriam ~ http://miriamscreations.blogspot.com
Hi all and welcome to my blog. I hope your enjoying the hop today. Dick Clark was an influence in my life and the show American Bandstand was a huge part of life. This was the go to spot on Saturdays at home or a friends house we made time to be in front of the TV for this show. This is where I learned to dance and kepted up with the latest dances, rate the record was a cool spot on the show after seeing it here and if I liked it then I was downtown to the local store getting the 45. Yep life without bandstand is unimagineable for me it rocked my world! 


 If you came from Jennifer then you are dancing on the right track. Now I must send you dancing along to Amanda
Don't forget, to win the candy you must stop by all the blogs and give some love!!
Dick Clark you will be missed!
November 30, 1929 - April 18, 2012
Thanks for hopping with us!!
 I hope your enjoying all the creations along the hop today. Leave a comment and you'll be in the drawer for some candy here to besides the big prize.
My blog candy-Just leave a comment today and your in the draw. I will post the winner on Tuesday.