Showing posts with label Baby. Show all posts

Saturday, April 15, 2017

7 Weeks LO for Sketch N Scrap Challenge

Good Morning and welcome :) Hope your Easter Weekend is going well :) Myself I got an extra day to enjoy so will probably be cleaning the craftroom a bit more this weekend.
Today over at Sketch N Scrap we a sketch by Heather Hall and just love what my DT sisters did with this sketch:
No automatic alt text available.
and this is the layout I created with the sketch:
I like to work on some old photos occasionally and these ones of Zachary sure are fun to scrap brings back fond memories for me. I love seeing photos like these come across facebook during his 1st year. At 7 weeks he was really starting to notice his surrounds more and the cute smiles just love seeing those.
I used my current counterfeit kit: Spring Garden and also the alphas came from my March kit. My journaling on some paper I got at a yardsale last year and really trying to work through the large stack.
Close up of the smile...
We look forward to seeing your creation linked up to Sketch N Scrap

Don't forget about the big bash next month for Sketch~N~Scrap's 5th Birthday it will be a month long celebration with an online crop too.


Monday, February 23, 2015

Baby Buggy Shape card for Creative Cutting Challenge

Good Morning you all :) As I am writing this we are getting another cold day and another cold week, they are talking negative temps again tomorrow morning. I hope this is the final brrrr week as February is coming to an end. The theme today over at Creative Cutting Challenge is Baby!  I have made a shaped card from the Baby Buggy cutting file, here is the card I made:
 I just love this file :) You can find the file at Cut and Create: Baby Buggy

Baby Buggy
The card was made with papers and cardstock from my stash. I inked up the white with SU Baked Brown Sugar ink, found this real pretty clam shell type paper when I was looking for the gold cardstock. the yellow Baby was cut from textured cardstock from a Baby paper pad. I added the button with some CTMH baker's twine and to the wheels I added the Ice Stickles that is in my current kit.
This is how I made it into a card:
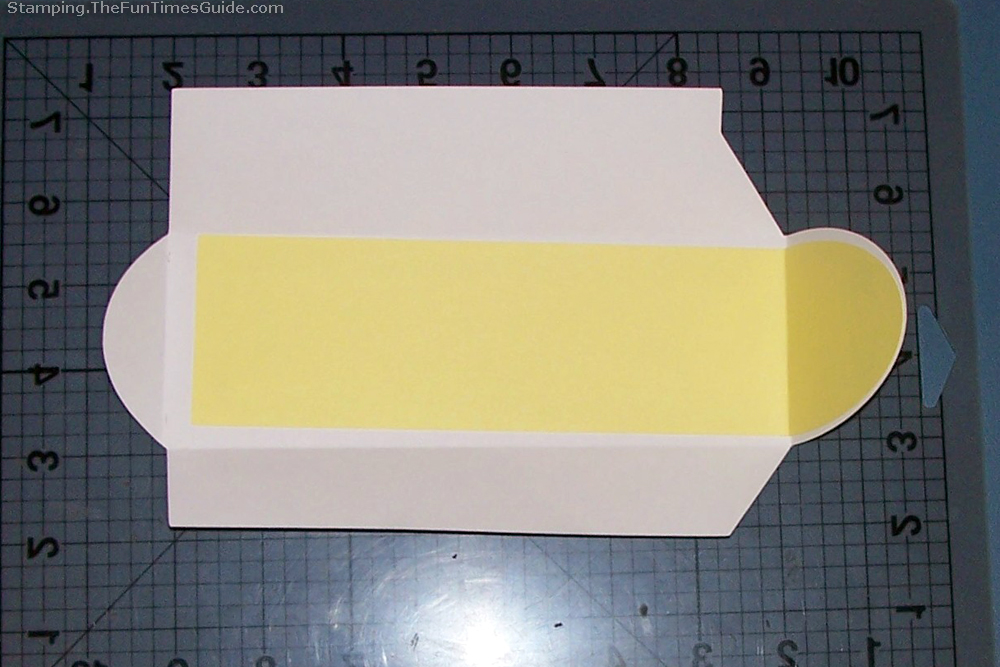
 This is where I welded it and how it looks opened. Love the welding feature in the cameo software just real easy to use.
this is the card base closed.
You all have a fantastic day and stay warm.......

Monday, February 17, 2014

Sweet Baby: CCChallenge-Baby

Good morning and welcome to my blog, I'm one of the designers over at Creative Cutting Challenge and it's all about baby this challenge. So my post is a card that I made:
using Creative Pointe's Baby Buggy file:
 Baby Buggy - Click Image to Close
This file was perfect for the card, to produce a Sweet Baby card. Depending on the designer, this file cuts really well, some svgs don't I'm finding out :)
I was able to jazz up the cut with a border created with a double edge punch: MS: Double Link Trim punch. I used a hunk of paper for another card so that left the 2" border with the word Sweet in the right place ( I love creative uses with paper) That paper came from the 6X6 Lost & Found Two Designer paper pad from My Mind's Eye. The sweet pea paper was in my stash for the background. Added a few buttons in my button collection and the bow. A very easy card :) The card base is 6 X 6 card cut out from a 12 X 12 cardstock I have in a Baby cakes collection paper pad.
The inside I used that same sweet pea paper and also the pink cardstock that the cardbase is cut from. Added more of that border and a couple of hearts from the card I posted on Friday.
The die-cut was cut from cardstock from my February Counterfeit Kit Challenge, The Abbey Road collection also from My Mind's Eye. (Enough from those 3 pieces for probably another card yet:) Also I did the bottom of the buggy piece with the cuttlebug embossing folder swiss dots for some dimension.


Thanks for stopping by today and seeing what I'm doing in my little corner of the world. Later...


Saturday, March 9, 2013

Diaper Pin Card


Hi you all, and welcome to my blog. Today I'm the designer over at Card A Day Blog for the final day of the baby theme. Ever in a hurry and need a card quickly, you know those times when you totally forgot about a function that your suppose to attend till it pops up on your calendar. Below is a card for that situation:

If you have a Cricut, come along and see how I made this adorable baby gift card

The trick with using the Wild Card cartridge when you want the matching envelope is to make the envelope first.
You load the paper you want to use for the envelope and choose “set paper size”.
I used light yellow paper in 12 X 12 size. Then, I choose the special “fit to page” option. This calculates and cuts the largest possible envelope for this size paper.
When you hit the “cut” button, watch the display closely to see the size. It will only show once, and it’s quick! In this case, it was 5″. This is now the size you must manually program for everything on this card.

The envelope has a cute little peek-a-boo diaper pin on the flap, and I am going to add a yellow liner that will show through when the flap is closed. I added my paper and selected the “liner” option at 5″. Sure enough, it fits right in and looks as cute as I had hoped.
 
Now, onto the card…

Make The Diaper Pin Shaped Baby Gift Card
Again choosing 5″, I cut the card out of yellow cardstock.
Once the card is folded, it’s obvious the top part (the actual pin part) is kind of flimsy and needs a backing. Fortunately, Cricut has thought of this and created the “blackout” feature — which means it will be the exact same size as the original object.
A liner, like I cut for the envelope, will be slightly smaller than the object — since it is designed to fit inside the object. So I used white cardstock to create a blackout copy of my card. I only needed the top section (to cover the diaper pin part), so I cut it in half. It fits perfectly and provides the stability the card needs.
The “liner” feature also has an option for detail on the pin closure, so I used purple patterned paper with with baby theme items on it. It fits right over the head of the pin. I used the Hannah Montana cartridge to cut B-A-B-Y in the base font at 1″.

For the inside of the card, I used the “Baby Blessings” phrase from Wild Card on page 76. Since this phrase is not directly connected to the diaper pin card, I have to choose the size I want. 5″ won’t necessarily work. So I selected “real dial size” and then 2″. And my phrase is exactly 2″!

This is a really cute card for a baby gift, and if it is for after the baby is born you could personalize it with the Baby's name.
Thanks for stopping by and seeing the view from my little corner of the world.....

Thursday, March 7, 2013

Baby Blue

Good Morning everyone, I'm the designer today over at Card A Day Blog, the theme this week is baby. The card I have today is in blue, but can be made in pink too.
Sorry for the bad picture the card base and the sentiment cut are both in white cardstock. The embossing folder for this card is Baby Bear folder from Darice. The sentiment was cut die cut with Spellbinders Ribbon Banners set and edges were inked with light blue ink, sentiment from unknown stamp I got at a yard sale.
At closer look of the card you can see that every few embossed dots were touched up with light blue stickles along with the heart on the foot and the nose of the bear. The embossed image was fussy cut around the dotted border and the addition of a purchased crochet flower with jewel finishes off the card.
This is really easy card to do most of the work is done with the embossing folder. Thanks for stopping by today and I wish you all a fabulous day!
Thanks for stopping by and seeing it from my little corner of the world.....

Thursday, September 1, 2011

1st Card-New Blog-Card a Day Blog

Hi you all I have some very exciting news I was the card designer for the Launch of the Card a Day Blog. If your interested in knowing more about this fabulous blog you can go here at the Card a Day Blog. We welcome you to play along and try the challenges too, you will find them on the challenge page of the Card a Day Blog. There will be a monthly prize given out to a random winner but you have to play to win!

So the theme this week is Celebrations. What better way to honor celebrations than with the celebration of a new life.
 I  made a baby shower card with the technique of welding a card base with a Gypsy: The scallop card base came from the Elegant Edges cartridge:

1st Step is the card base: I pulled up Scallop1-shift from the Elegant Edges cart in my gypsy for my card base. Duplicated the image and lined it up so  (2) scallops are on the same number on the y axis, Nudge them together slightly for the weld to take effect  along the edge to make the card base and then cut it out on the cricut.


this is what it looks like when I completed step 1. I used 8.5" X 11" cream cardstock for my card base. The cardstock was out of the Natural pack form ANW/Crestwood, Inc (The Paper Company) from Jo-Anns


Step 2: Using Circles Lg (#S4-114), Classic (Spellbinders die cut), using the largest one in the pack, cut out a circle from the same color card stock as the card base using the cuttlebug. Emboss that same circle w/ swiss dots folder through the cuttlebug leaving a 1an1/2" edge un-embossed and ink edges ( I used Stamping Up More Mustard ink to stamp the edges)
 

Step 3: Cutting out the bottom section of the circle. I used Baby/Rows of Icons cardstock (it is  Heidi Grace design paper from Fiskars). I choose the strip I wanted to use. I will need a 4" X 2" strip to fussy cut for the bottom part of the circle (used a section that had Baby and presents for this). Then cut it out with the same circle die cut from earlier. This is where you want to fussy cut the way that you want it to sit on the card and make sure all edges are under die to get the cut. I used tape to hold the die in place.

Step 4: Cut out the middle border. I used a piece of scrap cardstock that had a straight edge and punched the edge with Fiskars scallop edge punch and then cut it with a straight edge cutter leaving at least an 1/4" edge to glue to the pattern piece of paper for the border by 4 1/2". You could use any type of punch you would like to match the theme of your card. The scrap paper came from the Jewel pack from the same company mention previously.


Step 5: Putting the pieces together. Adhere border piece to pattern piece, trim off any excess of the green border. Then adhere that piece to the un-embossed edge of circle making sure edges line up. Cut ribbon at 4an1/2" length. Wrap ribbon over layered circle just under the green border and secure ends to the back of circle (I used scor tape to attach ribbon). Adhere layered circle to the scallop folded card base (I used ATG tape to attach together).


Stamp sentiment on the same color card stock as the base in black ink (I used Stampin Up basic black)and punch out with you chosen punch (I used Stampin Up extra large scallop oval punch). Ink edges with the same color that was used for the embossed circle attach with 1/8" foam tape and add a rhinestone or stickles to give it some bling (I used a rhinestone from KaiserScrapbook). To dress it up more add an image of balloons or a rattle. I used the rattle from Cricut Sampler cartridge @ 2" and used 1/16" foam tape to attach add some stickles to the yellow card stock. A perfect card for a baby gift.

Another version of the same card just with balloons. The inspiration for these cards came from the May 2001 issue of CardMaker. I had never made this type of card before so it was fun for me to try a new technique. I have included this card in a challenge at Fantabulous Cricut Challenge Blog the color yellow is the challenge-to have yellow on you card. I have also included this in the Stampin Sisters in Christ Challenge #105 for pastel colors. This was a fun project, I hope you enjoyed it as much as I did.