Sunday, March 31, 2013

Happy Easter

I want to wish all my followers a Happy Easter!
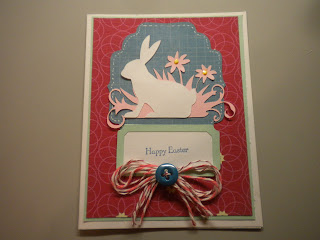
I made this card for March's Cricut Card Exchange FB group I belong too. It's a great group of very craft talented women. The theme this past month was Baby or Easter and I chose Easter when I seen this similar card and knew I had to C.A.S.E. it. The one I had left over went to my Aunt Dorothy.
The process:
First I cut out all the pieces needed for the cards (8 total made) The blue background block behind the bunny was cut from Art Philosophy shape 7 @ 3.5" from the DCWV Cotton Bloom pack. The rabbit and flower background was cut from Celebrate w/ Flourish-easter2 cut @ 2.5" just the base and the full rabbit, base in pink cardstock and the rabbit in white cardstock. Sentiment blocs was cut from Art Philosophy rectangle 4 @ 1.25" the block and frame were cut from cardstock. I used liquid pearls-Buttercup for the flower centers.
White cardstock for the card base, one layer of the same green and layer of the red from the Cotton Bloom pack. Put all the pieces together, created a bow from 2 pcs of each SU Cherry Cobbler & CTMH Smoothie bakers twine


Added a blue button from my stash that matched perfectly with the blue background. Attached both with small & medium zots and the stamp is SU.
This card was way out of my comfort zone, but it was fun to make. I know I need to check out some youtube making bows tutorials, still struggle with that.

Have a beautiful day and for me I'm glad to a Savior that died for me and my sins. I thank God for his grace and for all the blessing I receive each and everyday.
Saturday, March 30, 2013

Ethnic Food-PA Dutch Recipe Swap

Happy Saturday to all of you! Here in PA we are finally have some good weather today, sun is out and it's warming up. Thought it would be a great day to hang the laundry out too. Yesterday I got some terrific happy mail! My Jade Core Project Life came in the mail so now I'm set to really get caught up with my PL and you'll see many page spreads soon.


So I best get this posted and get busy cooking for the holiday tomorrow, so since my mind is on cooking I thought I would bring you another recipe from my past recipe swaps. This is from May 2011 the theme was Ethnic Food and I chose PA Dutch since most of my heritage came from some if not most of this group.
I made the card to replicate the simpler of life. The checkerboard background with golden yellow letters and pastel colors for the typed recipe and the included definition of Pennsylvania Dutch which surprised me that Pennsylvania Dutch is neither Amish or Dutch but is German descendants which I have from my Dad's side, fully German. Mom always said she was 1/2 Pa Dutch so I'm assuming it's from the Haines side of the family but as of yet I don't absolutely know, still working on that side of the family.
This pie is really a great comfort food too. Add some cooked chicken and you'll have a supper pie
I wish you all a fantastic day and take the time to be with family if you can, thanks for stopping by and seeing the veiw from my little corner of the world....

Friday, March 29, 2013

Playing the Card Game War

Good Morning all and Happy Friday! Are you ready for the weekend, I am . But first in honor of Good Friday I want to thank my Lord for what he did to cover my sins. I feel so blessed.

This is another layout from the April 2007 visit we had with Tammy, Mike and kids.
This night, Albert stopped by to visit and while visiting Mike and Brandon got into a game of war and looks like another game too maybe rummy. This layout came from the couple of pictures I took that night.
The card page kit I got from Oriental Trading and the stickers for embellishments some were included in the kit and some were purchased separately (Karen Foster design). The kit came with buttons and ribbon too but at that time I thought why would you use these on a layout, but now I know why, lol.
This was actually a cool kit and I have some left to use on some more game nights that we have done over the past few years. The kit included the paper, a page of a variety of embellishments (that is where the border came from), alpha sticker page and a bag of ribbon, button and brads taht never been open. 
There is still enough room to add some journaling, which I'll have to make a point to do.
Thanks for stopping by and I hope you enjoy your day!

Thursday, March 28, 2013

Pokerkeno Layout

Hello, hope your day is starting out well. I brought to you all today one of my first layouts
It's fun to go back and see what I have done and see how I've grown as a scrapper over the past 6 years. I would love to tear it apart and do it over, but I know that isn't right so I humble myself at how I have progress with the grace of God.
This was from when Tammy, Mike and the kids came to visit us April 2007. We love to play games when we all get together so I have a few scrapbook pages to show you of that visit. This was the night that Brad and Katherine were over visiting also. Love when we have family in the house (we are empty-nesters). We play this game with candy for the winners, the kids seem to really enjoy the game.
The card page kit I got from Oriental Trading and the stickers for embellishments some were included in the kit and some were purchased separately (Karen Foster design). The kit came with buttons and ribbon too but at that time I thought why would you use these on a layout, but now I know why, lol.
There is enough room that I can add a journaling spot with the date of the event, but other than that it will stay the way it is.
Thanks for stopping by today and seeing the view from my little corner of the world....

Wednesday, March 27, 2013

Beautiful Flower

Good Morning and I hope all is well with you, I'm the designer today over at Card A Day Blog, I welcome you to my blog, the theme this week is Thinking of You.
Sometimes the simplest things can make a beautiful card. A beautiful card for a friend lets them know your thinking of them without uttering a word.
The card is on a white card base and then layered with green cardstock and then the pattern paper (I got from my stash of scraps. The glittered trim center is used with double-sided tape


 then add the glitter tinsel Studio G style, packs that you can get at Michaels for a buck.
Add a layer of green cardstock square with rounded corners and then the white cardstock with rounded edges and inked with red ink (I think it's the lower brand at AC Moore) . Tip here: If you have ink that just doesn't stamp well then use it exclusively for inking edges, no lost of thinking it's gotta be tossed out.
I added a couple of flowers that I had forever-okay well since I got my first scrapping kit and a pearl for the center and you got a sweet card for a sweet friend.
Add a beautiful sentiment to the inside and you make your friend feel extra special and brighten her day! Priceless! A Beautiful was to let your friend know your think of her.

Stop by Card A Day Blog and join in on the challenge today....

Thanks for stopping by and seeing the view from my little corner of the world...

Tuesday, March 26, 2013

Belated Birthday Card

Good Morning,
The sun finally came out today that should make for a beautiful day
The card I have today I made in one of my Close to My Heart club that I attend
It's always nice to have one of these cards on hand, just incase you forget someone's birthday. This was made from all Close to My Heart products and I'll list what I do know:
The sentiment stamp is from: Card Chatter-Birthday Stamp Set
The card base is Kraft cardstock and I'm thinking the other 2 cardstocks used are: Vanilla Cream and Tulip and the ink is Hollyhock.  The flower was punched out with a  2"scallop punch and crumpled and inked with cocoa and the addition of the canvas badge button also inked abit. The other 2 stamps I'm unsure about and try to locate in the catalogs I have but couldn't find them.
It makes for a really cute card and that you don't have to rely on pattern paper to get the look you want you can create you own with stamps to have a unique background paper.
Thanks for stopping by and seeing the view from my little corner of the world....

Monday, March 25, 2013

Choco-Scotch Crunchies Recipe

Good Morning!
Have you all checked out HSN today. They got specials going on all day in honor of National Crafting Month. Oh I was just watching and I'm so interest in the Silhouette Cameo and I see me taking the plunge here sometime today for it with those flex payments they have. Okay do enough drooling for me this is what I have for you today:
This is from my Recipe collection of swaps I have done with a local group I'm with. This is from April 2011 and the theme was candy. I'm thinking the recipe came from the 1972 State Grange Book (this is my go to book for trying something new), and I wanted to try something new.

The title lettering I did on my Gypsy so I could weld it together, the Choco-Scotch was done with Birthday Bash and Crunchies is from Plantin SchoolBook. The candy was cut from Doodlecharms from page 63 with the charm feature. Looks like I used brown stickles for embellishing the recipe card and dotting the i. I also outline the letters with black marker to give separation from the page.

This was a fun project to do and very enjoyable, the candy didn't turn out to bad neither.
Thanks for stopping by and seeing the view from my little corner of the world.