Sunday, March 31, 2013

Happy Easter

I want to wish all my followers a Happy Easter!
I made this card for March's Cricut Card Exchange FB group I belong too. It's a great group of very craft talented women. The theme this past month was Baby or Easter and I chose Easter when I seen this similar card and knew I had to C.A.S.E. it. The one I had left over went to my Aunt Dorothy.
The process:
First I cut out all the pieces needed for the cards (8 total made) The blue background block behind the bunny was cut from Art Philosophy shape 7 @ 3.5" from the DCWV Cotton Bloom pack. The rabbit and flower background was cut from Celebrate w/ Flourish-easter2 cut @ 2.5" just the base and the full rabbit, base in pink cardstock and the rabbit in white cardstock. Sentiment blocs was cut from Art Philosophy rectangle 4 @ 1.25" the block and frame were cut from cardstock. I used liquid pearls-Buttercup for the flower centers.
White cardstock for the card base, one layer of the same green and layer of the red from the Cotton Bloom pack. Put all the pieces together, created a bow from 2 pcs of each SU Cherry Cobbler & CTMH Smoothie bakers twine


Added a blue button from my stash that matched perfectly with the blue background. Attached both with small & medium zots and the stamp is SU.
This card was way out of my comfort zone, but it was fun to make. I know I need to check out some youtube making bows tutorials, still struggle with that.

Have a beautiful day and for me I'm glad to a Savior that died for me and my sins. I thank God for his grace and for all the blessing I receive each and everyday.

Saturday, March 30, 2013

Ethnic Food-PA Dutch Recipe Swap

Happy Saturday to all of you! Here in PA we are finally have some good weather today, sun is out and it's warming up. Thought it would be a great day to hang the laundry out too. Yesterday I got some terrific happy mail! My Jade Core Project Life came in the mail so now I'm set to really get caught up with my PL and you'll see many page spreads soon.


So I best get this posted and get busy cooking for the holiday tomorrow, so since my mind is on cooking I thought I would bring you another recipe from my past recipe swaps. This is from May 2011 the theme was Ethnic Food and I chose PA Dutch since most of my heritage came from some if not most of this group.
I made the card to replicate the simpler of life. The checkerboard background with golden yellow letters and pastel colors for the typed recipe and the included definition of Pennsylvania Dutch which surprised me that Pennsylvania Dutch is neither Amish or Dutch but is German descendants which I have from my Dad's side, fully German. Mom always said she was 1/2 Pa Dutch so I'm assuming it's from the Haines side of the family but as of yet I don't absolutely know, still working on that side of the family.
This pie is really a great comfort food too. Add some cooked chicken and you'll have a supper pie
I wish you all a fantastic day and take the time to be with family if you can, thanks for stopping by and seeing the veiw from my little corner of the world....

Friday, March 29, 2013

Playing the Card Game War

Good Morning all and Happy Friday! Are you ready for the weekend, I am . But first in honor of Good Friday I want to thank my Lord for what he did to cover my sins. I feel so blessed.

This is another layout from the April 2007 visit we had with Tammy, Mike and kids.
This night, Albert stopped by to visit and while visiting Mike and Brandon got into a game of war and looks like another game too maybe rummy. This layout came from the couple of pictures I took that night.
The card page kit I got from Oriental Trading and the stickers for embellishments some were included in the kit and some were purchased separately (Karen Foster design). The kit came with buttons and ribbon too but at that time I thought why would you use these on a layout, but now I know why, lol.
This was actually a cool kit and I have some left to use on some more game nights that we have done over the past few years. The kit included the paper, a page of a variety of embellishments (that is where the border came from), alpha sticker page and a bag of ribbon, button and brads taht never been open. 
There is still enough room to add some journaling, which I'll have to make a point to do.
Thanks for stopping by and I hope you enjoy your day!

Thursday, March 28, 2013

Pokerkeno Layout

Hello, hope your day is starting out well. I brought to you all today one of my first layouts
It's fun to go back and see what I have done and see how I've grown as a scrapper over the past 6 years. I would love to tear it apart and do it over, but I know that isn't right so I humble myself at how I have progress with the grace of God.
This was from when Tammy, Mike and the kids came to visit us April 2007. We love to play games when we all get together so I have a few scrapbook pages to show you of that visit. This was the night that Brad and Katherine were over visiting also. Love when we have family in the house (we are empty-nesters). We play this game with candy for the winners, the kids seem to really enjoy the game.
The card page kit I got from Oriental Trading and the stickers for embellishments some were included in the kit and some were purchased separately (Karen Foster design). The kit came with buttons and ribbon too but at that time I thought why would you use these on a layout, but now I know why, lol.
There is enough room that I can add a journaling spot with the date of the event, but other than that it will stay the way it is.
Thanks for stopping by today and seeing the view from my little corner of the world....

Wednesday, March 27, 2013

Beautiful Flower

Good Morning and I hope all is well with you, I'm the designer today over at Card A Day Blog, I welcome you to my blog, the theme this week is Thinking of You.
Sometimes the simplest things can make a beautiful card. A beautiful card for a friend lets them know your thinking of them without uttering a word.
The card is on a white card base and then layered with green cardstock and then the pattern paper (I got from my stash of scraps. The glittered trim center is used with double-sided tape


 then add the glitter tinsel Studio G style, packs that you can get at Michaels for a buck.
Add a layer of green cardstock square with rounded corners and then the white cardstock with rounded edges and inked with red ink (I think it's the lower brand at AC Moore) . Tip here: If you have ink that just doesn't stamp well then use it exclusively for inking edges, no lost of thinking it's gotta be tossed out.
I added a couple of flowers that I had forever-okay well since I got my first scrapping kit and a pearl for the center and you got a sweet card for a sweet friend.
Add a beautiful sentiment to the inside and you make your friend feel extra special and brighten her day! Priceless! A Beautiful was to let your friend know your think of her.

Stop by Card A Day Blog and join in on the challenge today....

Thanks for stopping by and seeing the view from my little corner of the world...

Tuesday, March 26, 2013

Belated Birthday Card

Good Morning,
The sun finally came out today that should make for a beautiful day
The card I have today I made in one of my Close to My Heart club that I attend
It's always nice to have one of these cards on hand, just incase you forget someone's birthday. This was made from all Close to My Heart products and I'll list what I do know:
The sentiment stamp is from: Card Chatter-Birthday Stamp Set
The card base is Kraft cardstock and I'm thinking the other 2 cardstocks used are: Vanilla Cream and Tulip and the ink is Hollyhock.  The flower was punched out with a  2"scallop punch and crumpled and inked with cocoa and the addition of the canvas badge button also inked abit. The other 2 stamps I'm unsure about and try to locate in the catalogs I have but couldn't find them.
It makes for a really cute card and that you don't have to rely on pattern paper to get the look you want you can create you own with stamps to have a unique background paper.
Thanks for stopping by and seeing the view from my little corner of the world....

Monday, March 25, 2013

Choco-Scotch Crunchies Recipe

Good Morning!
Have you all checked out HSN today. They got specials going on all day in honor of National Crafting Month. Oh I was just watching and I'm so interest in the Silhouette Cameo and I see me taking the plunge here sometime today for it with those flex payments they have. Okay do enough drooling for me this is what I have for you today:
This is from my Recipe collection of swaps I have done with a local group I'm with. This is from April 2011 and the theme was candy. I'm thinking the recipe came from the 1972 State Grange Book (this is my go to book for trying something new), and I wanted to try something new.

The title lettering I did on my Gypsy so I could weld it together, the Choco-Scotch was done with Birthday Bash and Crunchies is from Plantin SchoolBook. The candy was cut from Doodlecharms from page 63 with the charm feature. Looks like I used brown stickles for embellishing the recipe card and dotting the i. I also outline the letters with black marker to give separation from the page.

This was a fun project to do and very enjoyable, the candy didn't turn out to bad neither.
Thanks for stopping by and seeing the view from my little corner of the world.

Sunday, March 24, 2013

Thinking of You with flowers card

So sorry about the delay today, I had recipe swap and CTMH club, so it's been a crafty day today.
This is a card we made in Stampin Up class a year or 2 ago. Oh I am so waitin on Spring to get here already.
It's nice to see the old cards once in awhile, just to see how I have progress in my crafting skills. It was a fun card to do, lots of stamping, fussy cutting and coloring.
Hope you all had a swell day, as we expect more snow tomorrow, I bid you well for now and thanks for stopping by ans seeing the view from my little corner if the world

Saturday, March 23, 2013

Taco Stew Recipe Swap

Good Morning All
A recipe for you today from a previous recipe swap:
This is what it looks like:
The recipe came from my SIL, she brought it to one of the family gatherings and you want to talk about good! This is Yum Yum Yum! The background paper is from Recollections: Bright lights Big city, The blue paper for the pot is from I think My minds eye magnolia pack, black cardstock and Studio G blue glitter glue. The cut is From my Kitchen cricut cartridge and was cut at 5" and the lettering is cut from SCAL lettering at .75" but squished to 2" wide to fit the spots an cut from DCWV red card stock.

Thanks for stopping by and seeing the view from my little corner of the world and enjoy your day!

Friday, March 22, 2013

A Starry Just for You Card

Good Morning,
I am so ready for spring that I thought this card would just cheer us up today with flowers. This card was done during one of my local scrap store classes.
Now I don't have to much info on the card because it was a class, but I do know that the card base is purple cardstock, Then the white cardstock cut was marked with a pencil where you wanted the split in the card. On the top side the card stock was stapmped with versamark ink with a flower stamp and then heat embossed with clear embossing powder and rubbed with purple chalk to bring out the flowers. This is such a fun technique and I definitely need to use it more in my card making. the seperation was made with score tape and fine glitter on top of the tap. then the card was stamped with SU Oval All stamp set and the flower  is 2 stamps fussy cut and added a brad. The edges were inked. This stamp just makes this card so versitle it could be for a birthday, a note or a kind gesture just to name a few examples.
How often do you heat emboss? I think I need to do it more often. Thanks for stopping by and seeing the view from my little corner of the world.

Thursday, March 21, 2013

Hobby Day 5 Smash

Well this challenge was a no brainer, lol. Hobby was a pretty easy page to do, since I enjoy paper crafts for my hobby I covered the 4 that I enjoy with these 2 pages
As I've been going page by page in this particular smash book, I couldn't have asked for a better page for this theme. I enjoy Scrapbooking (traditonal and digital), Cardmaking and Smashing and they are all included in this layout. It was done in a smashbook (got that covered!), the top left portion of the page shows the very first digital scrapbook layout I did and now it's a hybrid scrap with adding some traditional scrapping included. The bottom left includes a card that I did in a class learning a new technique of resist embossing (which was so cool to learn).
The right side page, I enhanced the page with words of my guilty pleasures of my hobby of paper crafts, one I enjoy doing each day a little something with crafting. It was a really fun page to do. Looking forward to sharing with you all 2 pages I have been researching a bit to do the pages (a quirk to my personality to research before I do it)
Now I have another paper craft that I enjoy, Project Life and can't wait to share with you what I have been doing with that.
Thanks for stopping by today and seeing the view from my little corner of the world....

Wednesday, March 20, 2013

A Toast

Hi, and welcome to my blog, I'm the designer today over at Card A Day Blog and I got an easy congratulations card for the happy couple.

This card is so easy to make if you have the right stuff on hand. I've started to cut various colors of card stock to A2 size to have it available for when I need a quick card. So this started with a white card stock base.
The rest comes from a kit club I belong too. Paper Wishes has this wonderful product called dazzles and can they make a card look cool. So I belong to the monthly dazzles club and you get some wonderful products to try before you ever consider buying them. So the paper and all the elements of this card came from that monthly set. The paper is a border print and quite lovely for the card. Don't shy away from border prints there a fantastic way to add to you card without a lot of bulk. Then I took the Champagne glasses and had them as if clanking together as after a toast is made and these are special enough for any couple. Add the sentiment that came on another sheet and a strip of silver dazzles up through the borders to give a nice look to the border edge and a swirl and you got yourself a beautiful card.
Added the border paper to the inside
To add a quick message to the new couple. So this card is perfect for an Engagement or Wedding.
Thanks for stopping by and seeing the view from my little corner of the world.....

Tuesday, March 19, 2013

Happy Spring a Day Early

I wish you all a Happy Spring a day early, I'll have a Card A Day Blog post on tomorrow. No spring in sight for our area by the latest forecast. We got 3.5" of snow yesterday and the outlook for the next 2 weeks is cold cold cold!
My card for the day
This was made in one of my Close to My Heart club class. It's a really cute card and the colors go together so well one nice thing about getting the packaged paper everything will match real good. The paper set is Miracle and the stamp set is Springtime. Not sure of the inks used, but the boot was covered with liquid glass to give an 3d effect which was fun to learn.

Thanks for stopping by and see the view from my little corner of the world....

Monday, March 18, 2013

A New Dog that has A New Home-CC Challenge

Hi you all, hope you had a fantastic weekend. I'm here today with another Creative Cutting Challenge: Anything Goes:


I used the Dog Elements from Creative Pointe for couple of die cuts on my layout.
 Dog Elements - Click Image to Close
My layout came to be from this sketch:


Pet Scrapbook Page Idea and Free Scrapbook Page Sketch
This layout come to be from the first few pictures we took of Buddy when I brought him home. This was the first picture I took of Buddy in his new house, we kept him in the basement till we could get him and Jake acquainted (that is another layout coming on the blog soon). The journaling tells of the story of getting Buddy.
I used the die cuts to emphasize the title of the layout Dog for A New Dog and the House for A New Home for Buddy.


I think my smashin is carrying over to my layouts, startling to use more stickers, and adding more elements. Might be a good thing it might not.
The items used in the layout are:
Background paper and the brown cardstock is from the ki memories Playful Pets pad, black cardstock, and the borders are from scraps. the journaling and photo matting came from a pc of Staples cardstock. The A & N came from Animal House sticker page, 7 weeks came from Authentique petite type letters. I used a fiskars round punch on most of the pictures and matting and I used SU 2 3/8" scallop punch. Stickers came from Animal House diecut stickers and Sticko Family Dog pack and the metal index tab clip came from making memories-dog pack.

I just loved doing this layout and completing part of Buddy's life with us as I catch up with my scraping. This is Buddy today almost 8 years old:

Thanks for stopping by and seeing the view from my little corner of the world.


Sunday, March 17, 2013

Favorite Place Day 4 Smash

Hi you all and Happy St. Patricks day to you! Were having our 2nd annual Easter Egg Hunt today, love spending time with the grand kids!
Today I thought I would bring another one of my loves: My scraproom. The favorite place day 4 smash challenge was so easy, my favorite room in the house is where I can go relax and create anything my mind can think of.
This page was created May 12, 2012 and the pictures were of the current state of the room. But the page tells it all, a place to get cheap thrills and lots of fun, where I can inspire, dream and create, this is my happy place and my favorite place. I used a variety of elements in the page stickers, chipboard letters, ribbon, washi tape and some journaling.
Do you have that favorite place you like to go, your own happy place. I hope you do and thanks for stopping by and actually seeing my little corner of the world, have a great day!


Saturday, March 16, 2013

Bless this Nest

Good Morning and Happy Saturday to you!
The card I have for you today is one I made in our Close To My Heart club we have each month. My rep Pam comes up with some really cute ideas for cards
Since it was made in this particular class I don't have all the details, I know everything used is from Close to My Heart and the products are from an earlier catalog than the spring/summer 2012. It really turned out well and not hard to lift, and a great use of striped cardstock for one of the panels. Very balanced card, sweet one for a new home owner.
Thanks for stopping by and seeing what I'm up to in my little corner of the world...

Friday, March 15, 2013

It's Your Birthday

Hi All,

Yay! Friday! It's been one of those weeks, busy but feels as if I got nothing done.
The card I got today was one I made for a local swap group, the specific was embellished, so it had to be embellished some way
Now this is a real easy card to make and when you got to make 21 of them you want easy. I choose blue and yellow for my palette because they compliment each other. This is a 4.5" X 6.25" card the base is cardstock from The Paper Co. value pack, the background cut at 4" X 5.75" pretty sure it came a purchase from Michaels (need to keep better notes). I added 3 different embellishments to the card plus my sentiment. The yellow flower is a MS punch: embroidery, the yellow border from cardstock (Jewel pack from the Paper Co.) I think 1.5" wide punched with recollections border punch (they don't seem to mark a name on their packages) the ribbon is American crafts I got for a buck and the sentiment punch is SU Punch Builder Ticket Duo and the stamp is from a fiskars pack done in CTMH juniper ink.
 As you can tell I don't favor one company when I make my cards I like them all! You all have a fabulous day and thanks for stopping by and seeing the view from my little corner of the world...

Thursday, March 14, 2013

Red Raspberry Muffins

Good Morning All
A recipe for you today:
I belong to a local recipe swap group and we do the swaps as a paper craft. the dimentions of the cards are 6 X 6 so you have plenty of room for the recipe and any embellishment that you want to add. This recipe is from February 2012 and the theme was Red. So first I located the recipe on the internet that I wanted to do.
First I worked on the lettering files that I wanted to use for this recipe in SCAL. Also purchased a cut file collection from SVGcuts. com: Moonlight Garden Party for the raspberry, there are other cool files in this that I will use for other things too.
So all the prep work is done:
All the pieces were cut from DCWV: Cotton Bloom pack I had gotten at TJ Maxx for a steal! Oh they have not had any good deals like that in a long time, lately no scrapping stuff at all. All the words were cut from SCAL except muffins which was cut from My Kitchen Cartridge @ 2". The recipe was a bit long for the card so I folded in half and attached to the card that way. the recipe is held down with a flower type jewel I have in my stash. The background paper is Basic Grey: Vintage tee.
The recipe is:


1½ sticks plus 3 Tbsps of margarine
1-1/3 cups of sugar          2 pinches of salt
1 Tbsp. vanilla                   4 eggs
1-2/3 cups of flour           1-3/4 tsp. baking powder
1 cup of fresh raspberries           
1 Tbsp. & 1 tsp. of vegetable oil

Preheat oven to 375 degrees. Cream butter, sugar, salt & vanilla with mixer until fluffy. On medium speed, add eggs one at a time and mix. Mix dry ingredients together in separate bowl. On low speed, add the dry ingredients in two increments. Mix in oil. Then fold in raspberries. Divide among muffin tins that have been lined with paper. Top with streusel. Bake for 25-28 mins. Or until tester comes out with very few crumbs. Let cool for 10 mins, top with glaze.

                Streusel:
5 Tbsps. of margarine    1/3 cup of sugar
1-1/2 cups of flour           ½ tsp. cinnamon

Mix all together with a paddle attachment on the mixer at a slow speed until it begins to cling together. Or crumble with fingers until it clings together.

                Glaze:
½ cup of confectioners’ sugar
2-3 Tbsp. of milk

Whisk together till smooth. Add sugar or mild as needed to obtain the right consistency, Drizzle over muffins


It's a quick and tasty recipe.

Thanks for stopping by to see what I got cooking up for you today and I hope you enjoyed the view from my little corner of the world....

Wednesday, March 13, 2013

Favorite Animal Smash page

Sorry you all running a little late today on posting, I seem to be struggling with the time change.

Looking through my Smash books posts found that there are a few I never posted on, wow that is a surprise. Thought I would have been all over this since it's one of my favorite things to do. This 2-page spread came about from a challenge that I was working on, still in process of finishing it, but here is Day 2: Favorite Animal. My favorite animal will always be a dog of some sort or breed, while growing up we always had dogs at home, but that is for another day and another page. For this one, my favorite animal are the boys we got at home now and their particular breed:
These are our boys Jake and Buddy and on the left page is a printout of what breed they are and explains about the breed: Australian Cattle Dog specifically they are Blue Heelers. In PA this breed is unusual, but as of late more people know of the breed as people bring them in from other states. I surrounded the write up with descriptive trait words of the breed that I did with my brother label maker, the included arrow is from Close to my Heart that is pointing towards the picture. The picture is surrounded by bits and pieces from my stash, scraps of paper from other projects, ribbon, and stickers from sticker sheets I imagine that are in the dog paper drawer, yes I have a specific drawer for the dogs. I thought it turned out well and sums up the breed well to.
Thanks for stopping by and seeing the view for my little corner of the world, have a fabulous day!

Tuesday, March 12, 2013

A Magical Birthday Card

Good Morning!
Thanks all for stopping by today to check out the card I made for my grandson's birthday this week. I worked on this card last night and was excited on how well it turned out, he's gonna enjoy it I think!
This was a really fun card once I started getting it put together. I figured out Saturday night that I wanted to use the stamp set Magic Adventures from Close to my Heart for his card, it's just a fun set. So I did a little searchin online to see what others are doing with this set and got a little inspiration for this card.
The making of the card started with stampin the image on white cardstock scraps with Tuxedo Black ink all the stamping was done with this ink (it's becoming one of my favorites). The card base is white cardstock, background paper is from the colorblock Arithmetic paper pack fussy cut to get the bottom border. The second paper came from my stash drawer. The coloring on the stamp was done with Sharpie markers.
I tried to make the fireworks that I seen here for inspiration out of SU Cherry Cobbler baker's twine and star brads from a studio basics 101 set with prongs taken off and attached with foam tape. The sentiment was from the same stamp set and punched out with SU-Extra large 2-3/8" scallop circle inked with brushed courduroy distressed ink and popped up with foam tape.
and yes you can see in the picture that the stamped image was attached with a CTMH-Adhesive spring (a generic wobble?)
 
Since I have been watching Mary from Cardz TV and seeing what she's been doing to the inside of her cards, I have been trying to do that too, just makes the card a little more personal. So the inside of the card includes the paper from the front, the sentiment from CTMH-Card Chatter-Birthday stamp set stamped on a scrap of white cardstock and doodle a bit on the corners. The included colored stamped image is from the Magic Adventures set too.
This card turned out really cool, been awhile since I was this excited on how a card turned out and I really went out of the box on this one. Want to praise God and thank him for giving me the creativeness I have.
Hey you all have a fantastic day and thanks for stopping by and seeing the view from my little corner of the world.


Monday, March 11, 2013

Smash your Stash: Challenge 3

Good morning hope your having a fantastic day! We just had the best weekend by the way of weather for this year, I think spring finally shown up. It was absolutely gorgeous with temps close to 60 and sun sun sun all day! Enough of the weather and on to the challenge:
Challenge 3: your nicknames, we all have them...time to SMASH them....but here's the twist, all elements must be in your favorite colour :) So the challenge is your nicknames and your favorite colours!!!!!!
What is a nick name:
1. A descriptive name added to or replacing the actual name of a person, place, or thing.
2. A familiar or shortened form of a proper name.
Since my name could be the nickname of other names, I feel I was already born with a nick name. The page was smashed in my Black: Book About Me smashbook. My fav colors are purple and gold. All the various names were cut from the cricut: from top to bottom: baby 1" Child's Year the negative of the scallop oval, Gram 1.75" Jasmine, honey 1" @ real size w/ the Just Because, Mom 2" Mother's Day, Sis .75" Don Juan regular font, Mommy 1.5" Heritage and Cous 1" Don Juan under pressure font. The purple cutout behind the smash sheet was in my scrap drawer, this is from a calender I received one year and I'm unsure the cart that it was cut from. The smash book page is from the family pack. The flowers are from 2 different companies that I have in my stash.
It was fun and interesting to put this together. It took a while to cut all the words out with changing out the carts and using the different fonts.
Hey you all have a fantastic day and thanks for stopping by and seeing the view from my little corner of the world.
 

Sunday, March 10, 2013

Project Life 2013: Title Page

Good Morning
I wanted to share with you what I did last night. I got my title page done for my 2013 project life album. It sure is an interesting process, the planning takes up 1/3 of the time, editing the pictures takes up a 1/3 of the time and then the creative physical process of the page with the last 1/3. But I think I can safely assume the weekly ones won't be so bad, if I start planning it the same week as it is happening.
I did alot of looking at other title pages on google to get a feel of what others are doing and that helped inspire me to this page.
The nameplate I chose to do, it explains what the album is about. The cast of characters for this album: The main characters:

Our Australian Cattle dogs-Blue Heelers of the breed

Supporting cast will be peppered through with our kids and our grand-kids, were just a couple of empty nesters enjoying life. Thanks for stopping by and checking out what I've been doing lately. I made it through a whole week on the blog a first for me and seeing this continuing now that I have understanding how I can prepare and be ready to post by the week. Off to get some more crafting done, I got a few unfinished projects I want to finish up today.
I hope you enjoy the view from my little corner of the world

Things I used for this page: the page insert is from Stampin Up assortment pack, the main paper line is Simple Stories Documented line, Dave and I's photo mats came from the My Mind's Eye Lost and Found 6X6 pack, ribbon, letters and vellum quote from my stash.

Saturday, March 9, 2013

Diaper Pin Card


Hi you all, and welcome to my blog. Today I'm the designer over at Card A Day Blog for the final day of the baby theme. Ever in a hurry and need a card quickly, you know those times when you totally forgot about a function that your suppose to attend till it pops up on your calendar. Below is a card for that situation:

If you have a Cricut, come along and see how I made this adorable baby gift card
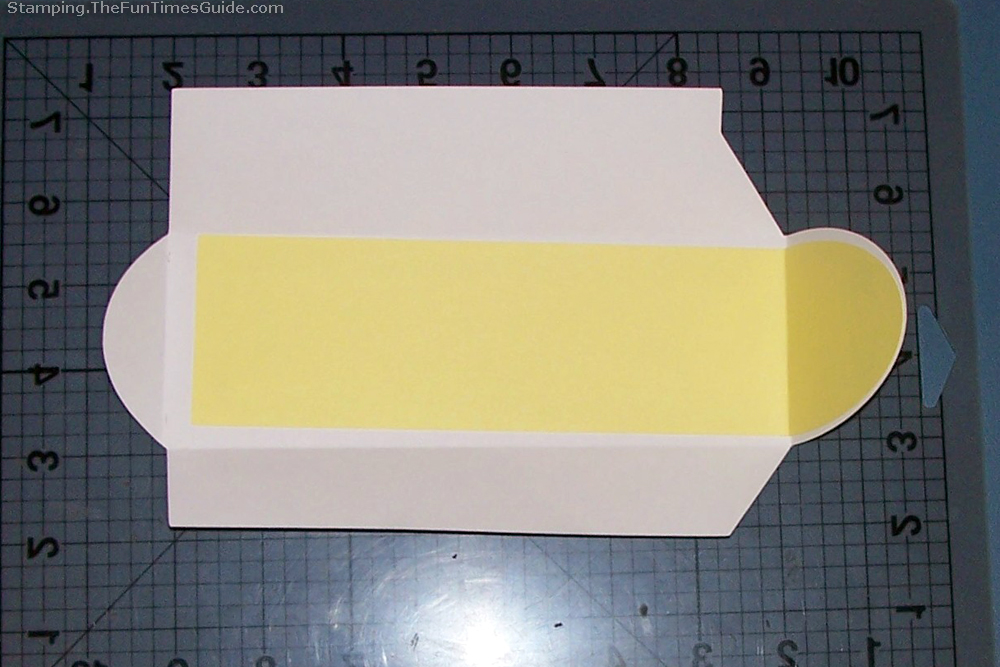
The trick with using the Wild Card cartridge when you want the matching envelope is to make the envelope first.
You load the paper you want to use for the envelope and choose “set paper size”.
I used light yellow paper in 12 X 12 size. Then, I choose the special “fit to page” option. This calculates and cuts the largest possible envelope for this size paper.
When you hit the “cut” button, watch the display closely to see the size. It will only show once, and it’s quick! In this case, it was 5″. This is now the size you must manually program for everything on this card.

The envelope has a cute little peek-a-boo diaper pin on the flap, and I am going to add a yellow liner that will show through when the flap is closed. I added my paper and selected the “liner” option at 5″. Sure enough, it fits right in and looks as cute as I had hoped.
 
Now, onto the card…

Make The Diaper Pin Shaped Baby Gift Card
Again choosing 5″, I cut the card out of yellow cardstock.
Once the card is folded, it’s obvious the top part (the actual pin part) is kind of flimsy and needs a backing. Fortunately, Cricut has thought of this and created the “blackout” feature — which means it will be the exact same size as the original object.
A liner, like I cut for the envelope, will be slightly smaller than the object — since it is designed to fit inside the object. So I used white cardstock to create a blackout copy of my card. I only needed the top section (to cover the diaper pin part), so I cut it in half. It fits perfectly and provides the stability the card needs.
The “liner” feature also has an option for detail on the pin closure, so I used purple patterned paper with with baby theme items on it. It fits right over the head of the pin. I used the Hannah Montana cartridge to cut B-A-B-Y in the base font at 1″.

For the inside of the card, I used the “Baby Blessings” phrase from Wild Card on page 76. Since this phrase is not directly connected to the diaper pin card, I have to choose the size I want. 5″ won’t necessarily work. So I selected “real dial size” and then 2″. And my phrase is exactly 2″!

This is a really cute card for a baby gift, and if it is for after the baby is born you could personalize it with the Baby's name.
Thanks for stopping by and seeing the view from my little corner of the world.....