So the theme this week is Celebrations. What better way to honor celebrations than with the celebration of a new life.
I made a baby shower card with the technique of welding a card base with a Gypsy: The scallop card base came from the Elegant Edges cartridge:
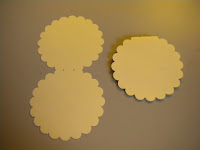
1st Step is the card base: I pulled up Scallop1-shift from the Elegant Edges cart in my gypsy for my card base. Duplicated the image and lined it up so (2) scallops are on the same number on the y axis, Nudge them together slightly for the weld to take effect along the edge to make the card base and then cut it out on the cricut.
this is what it looks like when I completed step 1. I used 8.5" X 11" cream cardstock for my card base. The cardstock was out of the Natural pack form ANW/Crestwood, Inc (The Paper Company) from Jo-Anns
Step 3: Cutting out the bottom section of the circle. I used Baby/Rows of Icons cardstock (it is Heidi Grace design paper from Fiskars). I choose the strip I wanted to use. I will need a 4" X 2" strip to fussy cut for the bottom part of the circle (used a section that had Baby and presents for this). Then cut it out with the same circle die cut from earlier. This is where you want to fussy cut the way that you want it to sit on the card and make sure all edges are under die to get the cut. I used tape to hold the die in place.
Step 4: Cut out the middle border. I used a piece of scrap cardstock that had a straight edge and punched the edge with Fiskars scallop edge punch and then cut it with a straight edge cutter leaving at least an 1/4" edge to glue to the pattern piece of paper for the border by 4 1/2". You could use any type of punch you would like to match the theme of your card. The scrap paper came from the Jewel pack from the same company mention previously.
Step 5: Putting the pieces together. Adhere border piece to pattern piece, trim off any excess of the green border. Then adhere that piece to the un-embossed edge of circle making sure edges line up. Cut ribbon at 4an1/2" length. Wrap ribbon over layered circle just under the green border and secure ends to the back of circle (I used scor tape to attach ribbon). Adhere layered circle to the scallop folded card base (I used ATG tape to attach together).
Stamp sentiment on the same color card stock as the base in black ink (I used Stampin Up basic black)and punch out with you chosen punch (I used Stampin Up extra large scallop oval punch). Ink edges with the same color that was used for the embossed circle attach with 1/8" foam tape and add a rhinestone or stickles to give it some bling (I used a rhinestone from KaiserScrapbook). To dress it up more add an image of balloons or a rattle. I used the rattle from Cricut Sampler cartridge @ 2" and used 1/16" foam tape to attach add some stickles to the yellow card stock. A perfect card for a baby gift.
Another version of the same card just with balloons. The inspiration for these cards came from the May 2001 issue of CardMaker. I had never made this type of card before so it was fun for me to try a new technique. I have included this card in a challenge at Fantabulous Cricut Challenge Blog the color yellow is the challenge-to have yellow on you card. I have also included this in the Stampin Sisters in Christ Challenge #105 for pastel colors. This was a fun project, I hope you enjoyed it as much as I did.


Sweet cards, Tina, and a great (and very detailed) tutorial. Nice to be on the same team with you. Congrats on being our launch queen!! :)
ReplyDeleteTina, I really love your card. Congratulations on being the blog launch designer. I will post my card which you can see at my blog http://mirincondepapel.blogspot.com/. Have a great experience and God bless you!!
ReplyDeleteJoan
This comment has been removed by the author.
ReplyDeleteLove the card and the tutorial was so helpful. Thanks Tina!
ReplyDeleteCongratulations, Tina, on being the first designer to post. You did a wonderful job on that cute little card you made, and a spectacular job on your tutorial. Can't wait to see all the other designers creations.
ReplyDeleteTina,
ReplyDeleteYou did a wonderful job on this tutorial. I have a Gypsy and will use it to recreate your card. The neighbors across the street just had a baby girl yesterday! Perfect timing!
Deborah
Both cards are so adorable! And nice tutorial :)
ReplyDeleteThanks for joining us this week at FCCB!
Lisa
Great card. They are adorable! Thanks for creating with us at FCCB this week :)
ReplyDeleteThank you all for the kind compliments.
ReplyDeleteGreat tutorial and such an adorable card. Thanks for joining us at the FCCB challenge this week.
ReplyDeleteaawww such a sweet, sweet baby card! Love the shape! Thanks for joining our challenge this week at FCCB!
ReplyDeleteWhat a great tutorial to start the Card A Day Blog.
ReplyDeleteYour cards are so sweet and cute!!
ReplyDeleteThanks for Playing with us @ FCCB!!
TFS!! Take Care!!
Jennie @ http://earthyscrap.blogspot.com/
These cards turned out wonderfully! What a fantastic tutorial Tina! Thanks so much for sharing! :D
ReplyDelete