Showing posts with label Cuttlebug. Show all posts

Friday, November 11, 2016

A Snowyflake Christmas Card for Funday Friday

Happy Veteran's Day to you and to all our Veterans :) There are many in my family that has served and I'm blessed with the freedoms I have because of their sacrifices :) I'm very proud of all of them! If you see a veteran today make sure to say hello!

It's Funday Friday over at Jo's Scrap Shack  It's Funday Friday over at Jo's Scrap Shack and our sponsors this week are Bugaboo and Little Blue Button Stamps. This week's challenge is 321 challenge: 3 colors, 2 embellishments, 1 technique:
I used Blue, White and Black for my colors, my 2 embellishments is the blue snowflake glittery stickers and the metal dots (in my current counterfeit kit: Falltoberfest. My technique was dry embossing.
I had used a wide variety of shades of blue on my card, close up of the dry embossing and I had colored my digi stamp with Wink of Stella in the Glitter Blue. The digistamp is Bugaboo: Santa's Reindeer
Thanks for stopping by today.

So make sure to play along this week~

    Starts: Friday, Nov. 11th  12:00AM
   Ends:  Friday, Nov. 18th    6:00PM
(Eastern time)

What do you need to do to enter?
Challenge Rules
1. Please post a direct link to your card/project post that includes your challenge,
using the linky tool below.
2. Be sure to include a link back to our challenge
3. THREE entries per person and you must post a separate blog post for each entry.
4. All entries must be NEW and created for the current challenge.
5. You may combine with other challenges as long as you link back to us in your post.
 * All entries that do not meet the challenge requirements
Will not be eligible for top 3 or random wins (optional from sponsors prizes)
Any random wins will only be mailed within the US and Canada only.
You have until Nov. 18th by 6:00PM (eastern) time to link up.
All winners will be announced during the week of Nov. 21st.
Have fun and we look forward to seeing what you create!

Friday, November 7, 2014

Thinking of You for the Funday Friday Challenge

Today I have a Thinking of You Card that I made for the Sympathy challenge over at Jo's Scrap Shack. This is a very quick card to make and perfect to give to the Male that is grieving a loss. Just a quick Thinking of You card so he knows that he is in your thoughts during this time. This is something that can be created very quickly when in need of a quick card.
 I used the Flourished Frame embossing folder, Cardstock from a pack of Natural Fashion colors and paper from My Minds Eye Magnolia Collection. The sentiment was made on the computer and printed on green pastel paper from Staples and punched with SU Scallop Oval punch.
The inside is left alone so I can add my own words to the recipient.
This week the winner receives a Guest Designer spot over at Jo's Okay now it's your turn to play along with us:


Just link up using our link up tool at the bottom of this post for your chance to win top 3 and get entered into our monthly prize drawing.
What do you need to do to enter? The rules are simple…
Challenge Rules
1. Please post a direct link to your card/project post that includes your
challenge, using the linky tool below.
2. Be sure to include a link back to our challenge
3. Three (3) entries per person and you must post a separate blog post for each entry.
4. All entries must be NEW and created for the current challenge.
5. You may combine with other challenges as long as
you link back to us in your post.
 * All entries that do not meet the challenge requirements will not be eligible for
the top 3 or random/monthly wins.
The monthly prize drawings will only be mailed within the US and Canada only
You have until November 14th at 6:00 PM (eastern) time to link up. .
Have fun and we look forward to seeing what you create!

Monday, February 17, 2014

Sweet Baby: CCChallenge-Baby

Good morning and welcome to my blog, I'm one of the designers over at Creative Cutting Challenge and it's all about baby this challenge. So my post is a card that I made:
using Creative Pointe's Baby Buggy file:
 Baby Buggy - Click Image to Close
This file was perfect for the card, to produce a Sweet Baby card. Depending on the designer, this file cuts really well, some svgs don't I'm finding out :)
I was able to jazz up the cut with a border created with a double edge punch: MS: Double Link Trim punch. I used a hunk of paper for another card so that left the 2" border with the word Sweet in the right place ( I love creative uses with paper) That paper came from the 6X6 Lost & Found Two Designer paper pad from My Mind's Eye. The sweet pea paper was in my stash for the background. Added a few buttons in my button collection and the bow. A very easy card :) The card base is 6 X 6 card cut out from a 12 X 12 cardstock I have in a Baby cakes collection paper pad.
The inside I used that same sweet pea paper and also the pink cardstock that the cardbase is cut from. Added more of that border and a couple of hearts from the card I posted on Friday.
The die-cut was cut from cardstock from my February Counterfeit Kit Challenge, The Abbey Road collection also from My Mind's Eye. (Enough from those 3 pieces for probably another card yet:) Also I did the bottom of the buggy piece with the cuttlebug embossing folder swiss dots for some dimension.


Thanks for stopping by today and seeing what I'm doing in my little corner of the world. Later...


Sunday, August 11, 2013

With Heartfelt Sympathy

Hi all, Today I'm the designer over at Card A Day Blog and the new theme is embossed (Wet or Dry). I've had this card for awhile waiting to post to this theme. This card came about from a Pick a number swap in The Northeast Scrapbook Friends yahoo group. I picked 6- Dry Emboss was my theme. Sympathy cards are always hard to do and so when I see a special one I try to lift it. This one came from a magazine.
Embossing in any form can make a card just a bit more of a special card, it can be just the slightest touch that can send that card to the next level. I really need to work on including it more often.
 The scallop shapes and the pennants both came for the Art Philosophy cartridge to the size I wanted in my gypsy.
 I started with cardstock from Staples in natural, next layer was Brown paper from Cloud 9 Design-Specialty Pack. The next layer is from CTMH Kraft cardstock run thru my cuttlebug with Honeycomb sizzix embossing folder I got from SU (makes a real nice background). The longer rectangle piece is Wallpaper style paper from SU: Well worn pack. the lace trim came from Making Memories: Chelsea's Place Trim pack.
The scallop border cut and the flower came from green distress style paper from my stash. The flower was cut from Forever Young cart at 1.75". The sentiment comes from CTMH Words of Comfort Occasions and with Chocolate ink. Added Queen & Co. Ivory Pearls to the scallops and the flower center.
Adhesives: ATG-1/8" & 1/4" Scor-tape and tomboy wet adhesive in the blue bottle.

This was a good card to do and will I hope the receiver feel great comfort from it. I love challenges and these cards in my thoughts are good for challenges cause now I'm prepared to give it to someone special. Thanks for stopping by today and seeing the view form my little corner of the world...

As summer starts winding down and so our garden winds down I'll get to my blog more often with new creations from all my craft passions. I'm taking on 2 classes so you should see what I'm crafting soon from those 2 classes, both are from the Big Pictures classes.

Follow my blog with Bloglovin

Monday, August 27, 2012

Just to say

Hi all and welcome
It is Faith week over at Card A Day Blog and today I'm the designer. My card was very easy to make and with the items already on hand really made it easy.
I started actually with the sentiment, which I came across in the book: Just the Right Words. Sometimes when I'm stumped for a card I investigate the books or magazines I have on hand for a bit of help. This one created the whole outlook of the card.
I seen on a facebook group today a tag that was printed and found out from the girl how she did it. She said to do a word document with the writing in the size you want and print it out.
Then pick your choice of what you want the print to go on (I have these (Stampin up) scallop punch Kraft paper ready in a drawer) use removable adhesive and put the piece to be printed over the computer print, wow it worked! I can see this coming in handy for a lot of things.
Then I chose the pieces that I wanted to use for the card. I knew that I had some stamped motorcycles in a drawer already stamped I got in a swap all I did was color it with Bic fine markers. The card base was a ready made one I found in another drawer (really trying to use up stuff I have on hand).
The swirls around the sentiment was cut from, I think, the Storybook cartridge that I cut out months ago for another card, that it didn't work on then. I thought this would add some nice dimension to the sentiment. The ribbon came from a roll and the background paper I got at Big Lots (cheap, wish I would have picked up another pack of the paper that day). So the background paper was embossed with a cuttlebug folder diamond plate.
This card is fantastic for a male taking a big step in life: Graduation or a new job, maybe in a new state.
This card took less that 2 hours to make cause I already had the items on hand, probably the longest part was deciding what to do for the theme. So if you have a few minutes take out some tools and stamp, or punch or even emboss those scraps and you next card will come together in a snap.
Thanks for stopping by and I hope you have a fantastic day!

Monday, July 30, 2012

Tigger Birthday Card

Hi All and if your stopping over from Card A Day Blog, welcome. The theme this week is die cuts and when I think of die cuts is either my cricut or my cuttle-bug that I go to for my cuts, this card has both.
This card was made for my grandson Zachy's birthday a couple of weeks ago. Tigger was cut from the cricut, I had gotten him in a swap cause this was one of the cartridges I didn't have. So trades can be good and this one was perfect for this card. The scallop piece behind tigger was die cut from Spellbinders classic scallop oval. The card base was out of a cardstock pack-celebrations. the lettering was from a pack I got at the local Dollar Tree store.
This was the inside of the card with a hand written note on the left hand side of the card. Brought in a piece of the card front to border the inside sentiment.

I love doing cards with die cuts cause it's so fun to see what you can create from paper to turn into a fantastic image.
Thanks for stopping by today and  have a fantastic day.... 


Sunday, May 13, 2012

Happy Mother's Day

This was a fun card to make (repost for Mother's Day) and I would have been proud to give it to my mother for Mother's Day.

The recipe for this A2 card is:
Dry emboss: Cuttlebug Victoria folder, Scallop cut came from Accent Essentials MoM cut came from Jasmine, Picher of flowers came from Country Life. Paper and Cardstock came from The Paper Company: Natural Fashion Colors and My Minds Eye Bella Bella collection and various scraps I had. Glitters is from stickles in yellow and gold.

I wish all the Moms out there in blog land a Happy Mother's Day, hope you all have a great day.

Sunday, April 15, 2012

For the Graduate

Hi and welcome to my blog. I am the designer today at the Card A Day Blog and the theme is Graduation. I made this card for a friend's daughter that is graduating this year.

See my friend, home school's her kids and they have the ceremony at the Church where the co-op is held. Because of this there is no school colors so I chose primary colors for the caps and switched up the tassels. The caps were cut from the cricut cartridge Everyday paper dolls @ 3/4". The ribbon border was in my stash and I matted the card with a scrap of black cardstock and dry embossed it with my cuttlebug with the folder: circles to give it a nice textured background. It is a white cardstock base from: The paper company pack of paper. The scallop is a spellbinders die and the stamp is from my collection stamped in SU basic black. The scallop is popped up with 1/16" dots. A sweet card for the graduate. I will add something special to the inside a quote from somewhere not sure of that quite yet. I have the book Saying it with Style and will find something sweet in there and a little something from me. It's a very fast card to put together once all the pieces are cut out and you could make it in the school colors.
Thanks for stopping by today and I wish you a fantastic day!

Monday, February 27, 2012

2 Silhouettes-CADB

Hi all,
I'm the designer today over at Card A Day Blog and want to welcome all to my blog. The theme this past week has been Wedding and I have a few cards that need to be made for weddings this summer so this worked out perfect for me.
Plus I had to do some cards for a swap that I was in so it was a win-win situation all the way around!

The inspiration of this card came for the latest copy of Paper Craft magazine. They were featuring some wedding cards, so it didn't take long to figure out what I wanted to do for the swap and today day at CADB. There a few others that I would like to try too so you just may see them soon.
< This is the inspiration behind this card, there was just something beautiful on the simplicity of the card.


This is what I used to make the card: It's A2 size card the base is tan cardstock from the paper company pack I think desert pack. The background paper is a brown (leather look) rounded on all the corners and came from the DCWV heirloom pack (lovin this pack at the moment!). Gold rickrack for my stash (my husband used to work in textiles I have lots of this type of stash). Silhouettes in black cardstock scraps. Stickles in distressed antique linen. I did notice with the distress stickles not so much of the glitter look, more of a matte look to it.
The 2nd layer of the card is from the same stack pack cut from the Lucy Labels @ 3.5". I used distressed ink: Brushed Corduroy for the edges of the pattern cut to give it more of antique look to it.


I taped the rickrack to the background and slide the ends behind that. The silhouettes  were cut from the heritage cartridge @ 1 3/4" and the & sign at the same height from the Stone Script cartridge.


This will go in the inside of the card and was cut with the cuttlebug and a spellbinder die I think the classic scallop oval. This was an interesting card to make and I did a few things I don't normally do, like inking the edges and the distress stickles (thought this was a great opportunity to find out how it would look).


Thanks for sharing the day with me and if your up for challenges there is just a couple of days left at the Card A Day Blog to enter.

Tuesday, February 7, 2012

Invited for Tea-CABD

Hope everyone had a fantastic weekend and had a chance to enjoy the hop over at the Card A Day Blog. If you have come from Card A Day Blog welcome to my blog.
The theme this week is invitation and I wanted to try something of a different type of invitation:
How about an invite for tea amongst the girls. This is a lovely way to ask a friend over for tea and talk time.
This card came about mainly from scraps. Since I worked on a journal challenge all day Saturday, I didn't have a chance to prepare a card. But in an hour and half Monday night this is the card I did.

While I was learning how to do the wet emboss technique I did a lot of different cuttlebug folders dry embossing and then wet embossed and added heat embossing powder. Well I kept all the extras in a box, which is so handy when you need to do up something quick.


Recipe for the card:

PAPERS: Card base is from the DCWV Rustic Stack, the doily border is from Coredinations gemstones paper, assortment of colored papers from my scrap stash.
 
INKS: Stampin up basic black and the sentiment was done with studio g chalks, wet embossing was probably VersaMark
 
DIECUTS:  Nestabilities  Labels Nine

STAMPS:  tea cup is SU and the sentiment is CTMH

ADHESIVE:  ATG Tape gun, Scotch 3M glue, pop dots 

PUNCHES: Lace Ribbon, 2 3/8" Extra-Large scallop circle and scallop oval both from SU
 
MISC:    Ribbon from stash, Lavender stickles, Crystal Stickers elements, butterfly stick pin (I received as a gift in a swap)

TECHNIQUES:  Dry Embossing, wet embossing

Don't forget the challenge going on over at Card A Day Blog there is a fantastic prize giveaway for this month and 3 different themes to work with. Thanks for joining me today and remember scraps can be your friend in a time of need, have a great day!
ENTER FEBRUARY CHALLENGE:

Wednesday, January 4, 2012

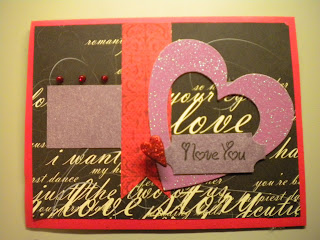
CADB-Valentine's Day Card with a sketch

Hi all and welcome back to the Card A Day Blog followers that followed over from the blog. Well the 1st card of the New Year, I am glad to be sharing it with the Card A Day Blog.
It's Valentines Day week at the blog, so this was perfect timing to create a card for my husband.

The card came from a sketch that is the challenge this week at Mojo Monday-The Blog it just seem like a great sketch to do a card with, I think I did a fair job getting close to the sketch:


I made this in mind for my husband to give to him on Valentines Day. After the fantastic Christmas that I had with him the love is overflowing at the moment and what a great time to do a card with all those feelings bubbling up.
What made this such a fun and interesting card to do was the black background paper that I wanted to use. This began as a 12 X 12 piece of scrapbook paper and I wanted the corner of it with all the writing and to have that word  Love emphasized from the paper so I did a fussy cut. Are you familiar with a fussy cut?

Now fussy cut is a term I learned when I was a quilter and it meant to specifically cut an item for what you want it for = fussy cut. So with the large piece of paper I just wanted the corner and fussy cut it to the right size. Boy those quilting tools really came in handy for this.
So now I have my main piece paper and I want to work around the large love in it and still follow the sketch so at this point I'm working piece by piece while measuring the sketch too, to get it all to work:


So here is the recipe for the card:
Cardstock: Red card base-The Paper Co.
Purple cardstock was from a scrap laying on the desk and it just fit with the card
Patterned paper: Black-ATD Occasions & Celebrations pad, Red-I think from DCWV Christmas pack
Stamps: Above Rubies pack received free with a DVD purchase
Ink:SU Basic Black
Punches: SU punch corner small ticket
Purple heart came from a Studio112 pack that I received in a swap
Brad: The red heart Creative Imaginations pack poppedup with (2) 1/8" Glue dots (eksuccess)
Stickles: Xmas Red
Adhesive: ATG & Scotch Scrapbooker's glue, Kokuyo Tape N Roller repositionable for the heart while putting the other elements together before permanently apply it

I have added this card to the following challenges:
Of course MojoMonday it was their sketch used


Give fussy cutting a try if you haven't done it before it is alot of fun to do, till next time....